a. e. b. This product may be substantially modified, by an individual
Anuncio
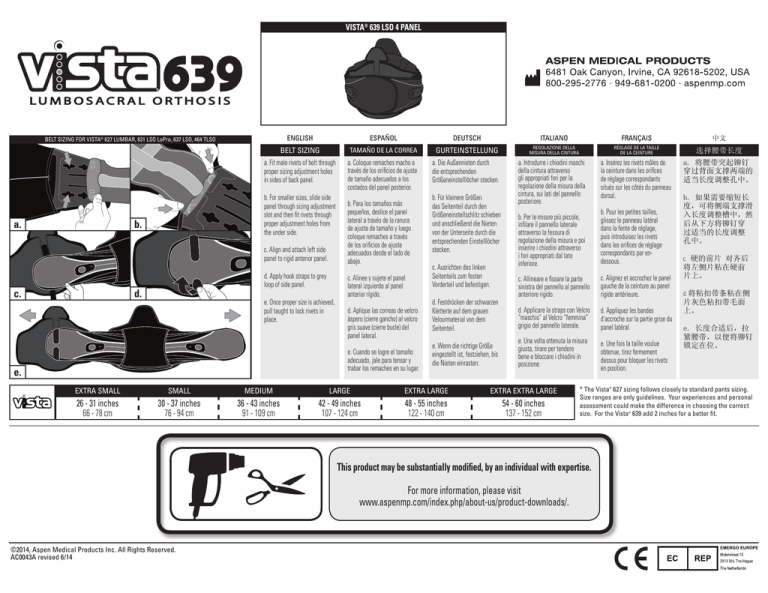
VISTA® 639 LSO 4 PANEL ENGLISH ESPAÑOL DEUTSCH ITALIANO FRANÇAIS 中文 BELT SIZING TAMAÑO DE LA CORREA GURTEINSTELLUNG REGOLAZIONE DELLA MISURA DELLA CINTURA RÉGLAGE DE LA TAILLE DE LA CEINTURE 选择腰带长度 a. Fit male rivets of belt through proper sizing adjustment holes in sides of back panel. a. Coloque remaches macho a través de los orificios de ajuste de tamaño adecuados a los costados del panel posterior. a. Die Außennieten durch die entsprechenden Größeneinstelllöcher stecken. a. Introdurre i chiodini maschi della cintura attraverso gli appropriati fori per la regolazione della misura della cintura, sui lati del pannello posteriore. a. Insérez les rivets mâles de la ceinture dans les orifices de réglage correspondants situés sur les côtés du panneau dorsal. a. 将腰带突起铆钉 穿过背面支撑两端的 适当长度调整孔中。 b. Per le misure più piccole, infilare il pannello laterale attraverso la fessura di regolazione della misura e poi inserire i chiodini attraverso i fori appropriati dal lato inferiore. b. Pour les petites tailles, glissez le panneau latéral dans la fente de réglage, puis introduisez les rivets dans les orifices de réglage correspondants par endessous. c. Allineare e fissare la parte sinistra del pannello al pannello anteriore rigido. c. Alignez et accrochez le panel gauche de la ceinture au panel rigide antérieure. d. Applicare la straps con Velcro “maschio” al Velcro “femmina” grigio del pannello laterale. d. Appliquez les bandes d'accroche sur la partie grise du panel latéral. e. Una volta ottenuta la misura giusta, tirare per tendere bene e bloccare i chiodini in posizione. e. Une fois la taille voulue obtenue, tirez fermement dessus pour bloquer les rivets en position. BELT SIZING FOR VISTA® 627 LUMBAR, 631 LSO LoPro, 637 LSO, 464 TLSO a. b. For smaller sizes, slide side panel through sizing adjustment slot and then fit rivets through proper adjustment holes from the under side. b. c. Align and attach left side panel to rigid anterior panel. c. d. Apply hook straps to grey loop of side panel. d. e. Once proper size is achieved, pull taught to lock rivets in place. b. Para los tamaños más pequeños, deslice el panel lateral a través de la ranura de ajuste de tamaño y luego coloque remaches a través de los orificios de ajuste adecuados desde el lado de abajo. c. Alinee y sujete el panel lateral izquierdo al panel anterior rígido. d. Aplíque las correas de velcro áspero (cierre gancho) al velcro gris suave (cierre bucle) del panel lateral. e. Cuando se logre el tamaño adecuado, jale para tensar y trabar los remaches en su lugar. e. b. Für kleinere Größen das Seitenteil durch den Größeneinstellschlitz schieben und anschließend die Nieten von der Unterseite durch die entsprechenden Einstelllöcher stecken. c. Ausrichten des linken Seitenteils zum festen Vorderteil und befestigen. d. Festdrücken der schwarzen Kletterte auf dem grauen Velourmaterial von dem Seitenteil. e. Wenn die richtige Größe eingestellt ist, festziehen, bis die Nieten einrasten. EXTRA SMALL SMALL MEDIUM LARGE EXTRA LARGE EXTRA EXTRA LARGE 26 - 31 inches 66 - 78 cm 30 - 37 inches 76 - 94 cm 36 - 43 inches 91 - 109 cm 42 - 49 inches 107 - 124 cm 48 - 55 inches 122 - 140 cm 54 - 60 inches 137 - 152 cm ©2014, Aspen Medical Products Inc. All Rights Reserved. AC0043A revised 6/14 c. 硬的前片 对齐后 将左侧片粘在硬前 片上。 d. 将粘扣带条粘在侧 片灰色粘扣带毛面 上。 e. 长度合适后,拉 紧腰带,以便将铆钉 锁定在位。 * The Vista® 627 sizing follows closely to standard pants sizing. Size ranges are only guidelines. Your experiences and personal assessment could make the difference in choosing the correct size. For the Vista® 639 add 2 inches for a better fit. This product may be substantially modified, by an individual with expertise. For more information, please visit www.aspenmp.com/index.php/about-us/product-downloads/. b. 如果需要缩短长 度,可将侧端支撑滑 入长度调整槽中,然 后从下方将铆钉穿 过适当的长度调整 孔中。 ENGLISH 1. PLACEMENT COLOCACIÓN a. Centre el panel posterior en el medio de la espalda lo más bajo posible pero que resulte cómodo. a. Das Rückenteil in der Mitte des Rückens möglichst weit unten zentrieren, wo es komfortabel anliegt. b. Envuelva el lado izquierdo de la correa ceñidamente a la parte delantera del cuerpo. b. Die linke Gurthälfte zur Vorderseite des Körpers wickeln. c. Repita con el lado derecho y, mientras inhala, presione la cinta de velcro para lograr un calce ajustado. c. Dann die rechte Gurtseite zur Vorderseite wickeln und während des Einatmens den Klettverschluss zusammendrücken, um einen festen Sitz zu erzielen. c. Repeat with right side, and while inhaling, press the hook loop material to achieve a snug fit. Note: Be sure top and bottom of brace is snug. If needed, angle ends to create a snug fit. b. c. DEUTSCH a. Center back panel in the middle of the back as low as is comfortable. b. Wrap left side of belt tightly to the front of the body. a. ESPAÑOL Nota: Verifique que la parte superior y la parte inferior del soporte estén ajustadas. Si fuera necesario, doble los extremos para lograr un calce ajustado. ANLEGEN Hinweis: Darauf achten, dass die Orthese oben und unten fest anliegt. Ggf. die Gurtenden etwas schräg zusammendrücken, um eine guten Sitz zu erzielen. ITALIANO FRANÇAIS 中文 POSIZIONAMENTO POSITIONNEMENT 穿戴 a. Centrare il pannello posteriore sulla parte mediana della schiena, quanto più in basso possibile, ma rimanendo confortevole. a. Centrez le panneau dorsal au milieu du dos et aussi bas que possible sans occasionner de gêne. a. 将背面支撑放在 后背中部居中,在舒 适的前提下尽可能 放低。 b. Amenez la partie gauche de la ceinture sur le devant du corps en serrant bien. b. 将腰带左侧端紧 紧卷至身体前面。 b. Avvolgere strettamente il lato sinistro della cintura sulla parte frontale del corpo. c. Ripetere con il lato destro e poi, mentre si inspira, premere il materiale di fissaggio a uncini e asole fino a ottenere una buona aderenza. Nota: assicurarsi che la parte superiore e inferiore del supporto siano ben aderenti. Se necessario, disporre le estremità del supporto in modo angolato per ottenere una buona aderenza. c. Procédez de la même façon avec le côté droit et, tout en inspirant, pressez sur la fermeture velcro pour obtenir un ajustement bien serré. Remarque: Veillez à ce que la partie supérieure et inférieure de l’orthèse soient bien serrées. Si nécessaire, inclinez les extrémités pour assurer un maintien ferme. c. 在右侧重复此操 作,在吸气的同时按 下锁环,以便卡住。 注:确保腰带上下两 端均被卡住。必要 时,可以转动两端以 便卡住。 Note 2. a. ENGLISH ESPAÑOL DEUTSCH ITALIANO FRANÇAIS 中文 TIGHTENING AJUSTE STRAFFEN STRINGIMENTO SERRAGE 拉紧 a. Pull strongly away from body. Tighten more than you need and then loosen to achieve a proper fit. Pull left tab to tighten lower, pull right to tighten upper as needed. a. Jale fuertemente en dirección opuesta a su cuerpo. Ajuste más de lo necesario y luego afloje para lograr un calce adecuado. Jale la pestaña izquierda para ajustar más abajo, jale a la derecha para ajustar más arriba según sea necesario. a. Die Zugleinen fest vom Körper wegziehen. Um den richtigen Sitz zu erzielen, den Gurt straffer als erforderlich festziehen und dann loslassen. Zur Straffung des Unterteils die linke und zur Straffung des Oberteils die rechte Zugleine ziehen. b. Die Zugleinen am Klettverschluss befestigen, um die Kompression aufrechtzuerhalten. a. Tirez fermement en écartant les bras du corps. Serrez plus que nécessaire, puis relâchez légèrement pour obtenir un ajustement précis. Tirez sur le tirant gauche pour resserrer la partie inférieure, et sur le tirant droit pour resserrer la partie supérieure, selon les besoins. a. 从身体向外用力 拉。先拉得紧一些, 然后再放松达到松紧 适宜程度。 根据需要,拉左侧拉 环以收紧下端,拉右 侧拉环以收紧上端。 b. Una las pestañas de ajuste a la cinta de velcro para mantener la compresión. a. Tirare con fermezza in direzione opposta al corpo. Stringere più del necessario e poi allentare per ottenere un’aderenza appropriata. Tirare la linguetta sinistra per stringere la parte inferiore, e quella destra per stringere la parte superiore secondo la necessità. b. Abbinare le linguette di tensionamento al materiale di fissaggio ad asole per mantenere la compressione. b. Fixez les tirants sur le velcro pour maintenir la compression. b. Mate the pull tabs to loop material to maintain compression. b. 3. LIMITED WARRANTY Aspen Medical Products, Irvine, CA 92618, warrants to the user who originally purchases this product that it is free from defects in material and workmanship. The sole obligation of Aspen Medical Products in the event of breach of warranty shall be to repair or replace the defective product or part(s). Aspen Medical Products shall have no obligation under this limited warranty in the event: (a) The product was not purchased from Aspen Medical Products or through its authorized channels of distribution; (b) The product is altered; (c) Any parts not supplied by Aspen Medical Products are inserted into the product; or (d) The product is not used in accordance with the Aspen Medical Products, Instructions for Use. ENGLISH ESPAÑOL DEUTSCH LORDO PADS ALMOHADILLAS PARA LORDOSIS LORDOSENPOLSTER Insert or remove Lordo Pads for personal comfort. Coloque o retire las Almohadillas para lordosis para sentirse más cómodo. Für individuellen Komfort die Lordosenpolster einstecken oder herausnehmen. THE FOREGOING IS THE SOLE AND EXCLUSIVE REMEDY FOR FAILURE IN SERVICE OF, OR DEFECT IN, THE PRODUCT. ASPEN MEDICAL PRODUCTS SHALL NOT BE LIABLE UNDER THIS OR ANY IMPLIED WARRANTY FOR ANY DIRECT SPECIAL, INCIDENTAL, OR CONSEQUENTIAL DAMAGES. THIS WARRANTY IS IN LIEU OF ALL OTHER WARRANTIES, EXPRESS OR IMPLIED, INCLUDING THE WARRANTY OF MERCHANTABILITY OR FITNESS FOR A PARTICULAR PURPOSE OR USE, AND ALL OBLIGATIONS OR LIABILITIES ON THE PART OF ASPEN MEDICAL PRODUCTS FOR DAMAGES ARISING OUT OF OR IN CONNECTION WITH THE USE OF THE PRODUCTS, WHICH ARE HEREBY DISCLAIMED AND EXCLUDED BY ASPEN MEDICAL PRODUCTS. This warranty gives you specific legal rights and you may have other rights which vary from state to state. Warning: To ensure proper use, please review all material. A listing of authorized distributors in your area is available upon request. ITALIANO FRANÇAIS CUSCINETTI LORDOTICI COUSSINETS LORDOTIQUES Inserire o rimuovere i cuscinetti lordotici in base alla comodità del paziente. b. 将拉环与锁环相 匹配,以保持压力。 Insérez ou retirez les coussinets lordotiques en fonction du confort personnel recherché. 中文 脊柱前凸垫 按照个人舒适程度, 插入或去除脊柱前 凸垫。 READ INSTRUCTIONS BEFORE USE. Proper training in the use of this device should take place before it is applied. These directions are guidelines only and are not offered as medical recommendations. THIS PRODUCT IS INTENDED FOR APPLICATION BY LICENSED HEALTH CARE PRACTITIONERS AS DIRECTED BY A PHYSICIAN OR OTHER QUALIFIED MEDICAL AUTHORITY. PERMANENT INJURY MAY RESULT FROM USE OTHER THAN AS DIRECTED BY A PHYSICIAN OR OTHER MEDICAL AUTHORITY. ASPEN MEDICAL PRODUCTS SPECIFICALLY DISCLAIMS ANY OBLIGATION OR LIABILITY FOR INJURY OR DAMAGE BY REASON OF ANY APPLICATION OF THIS PRODUCT. PLEASE SEE THE ACCOMPANYING LIMITED WARRANTY FOR FURTHER INFORMATION IN THIS REGARD. PATENT PENDING MADE IN CHINA
