Switch Click™ USB
Anuncio
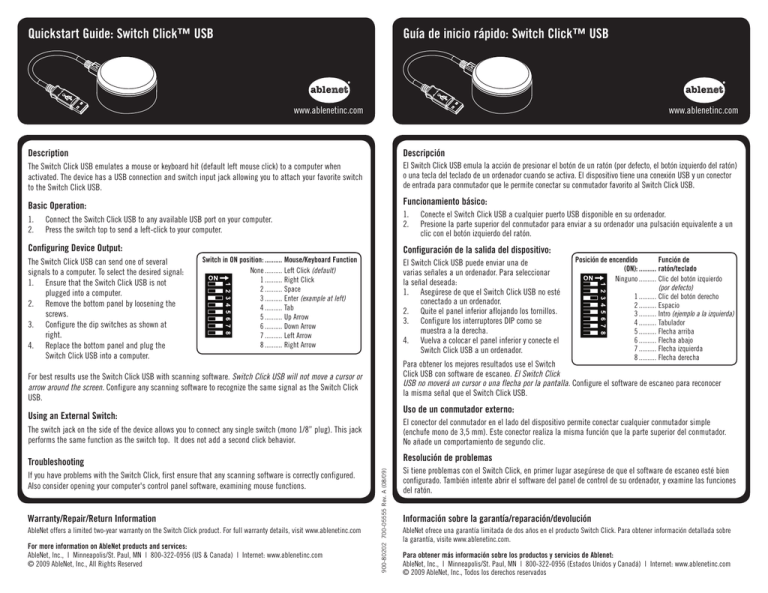
Quickstart Guide: Switch Click™ USB Guía de inicio rápido: Switch Click™ USB www.ablenetinc.com www.ablenetinc.com Description Descripción The Switch Click USB emulates a mouse or keyboard hit (default left mouse click) to a computer when activated. The device has a USB connection and switch input jack allowing you to attach your favorite switch to the Switch Click USB. El Switch Click USB emula la acción de presionar el botón de un ratón (por defecto, el botón izquierdo del ratón) o una tecla del teclado de un ordenador cuando se activa. El dispositivo tiene una conexión USB y un conector de entrada para conmutador que le permite conectar su conmutador favorito al Switch Click USB. Basic Operation: Funcionamiento básico: 1. 2. 1. 2. Connect the Switch Click USB to any available USB port on your computer. Press the switch top to send a left-click to your computer. Configuring Device Output: The Switch Click USB can send one of several signals to a computer. To select the desired signal: 1. Ensure that the Switch Click USB is not plugged into a computer. 2. Remove the bottom panel by loosening the screws. 3. Configure the dip switches as shown at right. 4. Replace the bottom panel and plug the Switch Click USB into a computer. Conecte el Switch Click USB a cualquier puerto USB disponible en su ordenador. Presione la parte superior del conmutador para enviar a su ordenador una pulsación equivalente a un clic con el botón izquierdo del ratón. Configuración de la salida del dispositivo: Switch in ON position: .......... Mouse/Keyboard Function None .......... Left Click (default) 1 .......... Right Click 2 .......... Space 3 .......... Enter (example at left) 4 .......... Tab 5 .......... Up Arrow 6 .......... Down Arrow 7 .......... Left Arrow 8 .......... Right Arrow El Switch Click USB puede enviar una de varias señales a un ordenador. Para seleccionar la señal deseada: 1. Asegúrese de que el Switch Click USB no esté conectado a un ordenador. 2. Quite el panel inferior aflojando los tornillos. 3. Configure los interruptores DIP como se muestra a la derecha. 4. Vuelva a colocar el panel inferior y conecte el Switch Click USB a un ordenador. Posición de encendido Función de (ON): .......... ratón/teclado Ninguno .......... Clic del botón izquierdo (por defecto) 1 .......... Clic del botón derecho 2 .......... Espacio 3 .......... Intro (ejemplo a la izquierda) 4 .......... Tabulador 5 .......... Flecha arriba 6 .......... Flecha abajo 7 .......... Flecha izquierda 8 .......... Flecha derecha Para obtener los mejores resultados use el Switch Click USB con software de escaneo. El Switch Click USB no moverá un cursor o una flecha por la pantalla. Configure el software de escaneo para reconocer la misma señal que el Switch Click USB. For best results use the Switch Click USB with scanning software. Switch Click USB will not move a cursor or arrow around the screen. Configure any scanning software to recognize the same signal as the Switch Click USB. Uso de un conmutador externo: Using an External Switch: El conector del conmutador en el lado del dispositivo permite conectar cualquier conmutador simple (enchufe mono de 3,5 mm). Este conector realiza la misma función que la parte superior del conmutador. No añade un comportamiento de segundo clic. Troubleshooting Resolución de problemas If you have problems with the Switch Click, first ensure that any scanning software is correctly configured. Also consider opening your computer's control panel software, examining mouse functions. Warranty/Repair/Return Information AbleNet offers a limited two-year warranty on the Switch Click product. For full warranty details, visit www.ablenetinc.com For more information on AbleNet products and services: AbleNet, Inc., | Minneapolis/St. Paul, MN | 800-322-0956 (US & Canada) | Internet: www.ablenetinc.com © 2009 AbleNet, Inc., All Rights Reserved 900-80202 700-05555 Rev. A (08/09) The switch jack on the side of the device allows you to connect any single switch (mono 1/8” plug). This jack performs the same function as the switch top. It does not add a second click behavior. Si tiene problemas con el Switch Click, en primer lugar asegúrese de que el software de escaneo esté bien configurado. También intente abrir el software del panel de control de su ordenador, y examine las funciones del ratón. Información sobre la garantía/reparación/devolución AbleNet ofrece una garantía limitada de dos años en el producto Switch Click. Para obtener información detallada sobre la garantía, visite www.ablenetinc.com. Para obtener más información sobre los productos y servicios de Ablenet: AbleNet, Inc., | Minneapolis/St. Paul, MN | 800-322-0956 (Estados Unidos y Canadá) | Internet: www.ablenetinc.com © 2009 AbleNet, Inc., Todos los derechos reservados Guide de mise en route rapide : Switch Click™ USB Kurzanleitung: Switch Click™ USB www.ablenetinc.com www.ablenetinc.com Description Beschreibung Lorsqu’il est activé, le Switch Click USB émule un clic de souris (clic gauche par défaut) ou l’activation d’une touche de clavier d’ordinateur. Le Switch Click USB a un port USB et une prise d’entrée de contacteur permettant le branchement d’un contacteur favori. Der Switch Click USB simuliert mit jeder Aktivierung einen Mausklick oder einen Tastaturanschlag (Standard ist Klicken der linken Maustaste) auf einem Computer. Das Gerät verfügt über einen USB-Anschluss und eine Tastereingangsbuchse zum Anschließen Ihres Lieblingstasters am Switch Click USB. Mode d’emploi de base : Einfacher Betrieb: 1. 2. 1. 2. Brancher le Switch Click USB sur tout port USB disponible de l’ordinateur. Appuyer sur le dessus du contacteur pour envoyer un clic gauche à l’ordinateur. Konfigurieren des Geräteausgangs: Configuration de la sortie de l’appareil : Le Switch Click USB peut envoyer différents signaux à un ordinateur. Pour sélectionner le signal souhaité : 1. S’assurer que le Switch Click USB n’est pas branché sur un ordinateur. 2. Enlever le panneau du dessous en desserrant les vis. 3. Configurer les contacteurs DIP comme indiqué à droite. 4. Remettre le panneau du dessous et brancher le Switch Click USB sur un ordinateur. Stecken Sie den Switch Click USB an einem freien USB-Anschluss an Ihrem Computer ein. Drücken Sie auf den Taster, um einen Linksklick an Ihren Computer zu senden. Contacteur en Fonction de position Marche (ON) : .......... souris/clavier Aucun .......... Clic gauche (par défaut) 1 .......... Clic droit 2 .......... Espace 3 .......... Entrée (exemple à gauche) 4 .......... Tabulation 5 .......... Flèche vers le haut 6 .......... Flèche vers le bas 7 .......... Flèche vers la gauche 8 .......... Flèche vers la droite Pour les meilleurs résultats, utiliser le Switch Click USB avec un logiciel de balayage. Le Switch Click USB ne déplacera pas de curseur ou de flèche sur l’écran. Configurer tout logiciel de balayage pour détecter le même signal que le Switch Click USB. Utilisation d’un contacteur externe : La prise de contacteur se trouvant sur le côté de l’appareil permet le branchement d’un contacteur simple (fiche mono 3,5 mm). Cette prise a la même fonction que le dessus du contacteur. Elle n’ajoute pas un second clic. Dépannage En cas de problèmes avec le Switch Click, s’assurer tout d’abord que le logiciel de balayage est correctement configuré. Penser aussi à ouvrir le logiciel du panneau de configuration de l’ordinateur et à examiner les fonctions de la souris. Der Switch Click USB kann jeweils eines von mehreren Signalen an einen Computer senden. Um das gewünschte Signal zu wählen: 1. Vergewissern Sie sich, dass der Switch Click USB nicht an einem Computer eingesteckt ist. 2. Entfernen Sie die Bodenabdeckung, indem Sie die Schrauben lösen. 3. Stellen Sie die DIP-Schalter wie rechts gezeigt ein. 4. Bringen Sie die Bodenabdeckung wieder an und stecken Sie den Switch Click USB am Computer ein. Schalter auf EIN (ON): .......... Maus- bzw. Tastaturfunktion Keine .......... Linksklick (Standard) 1 .......... Rechtsklick 2 .......... Leertaste 3 .......... Eingabetaste (Beispiel links) 4 .......... Tabulator 5 .......... Aufwärtspfeil 6 .......... Abwärtspfeil 7 .......... Linkspfeil 8 .......... Rechtspfeil Für optimale Ergebnisse sollte der Switch Click USB mit Scanner-Software verwendet werden. Das Bewegen eines Cursors oder Pfeils auf dem Bildschirm ist mit dem Switch Click USB nicht möglich. Konfigurieren Sie eine beliebige Scanner-Software, damit diese das gleiche Signal erkennt wie der Switch Click USB. Verwendung eines externen Tasters: An der Tastereingangsbuchse an der Seite des Gerätes kann ein Einzeltaster (3,5 mm-Monostecker) eingesteckt werden. Diese Buchse hat die gleiche Funktion wie die Tasteroberseite. Es wird kein zweites Klickverhalten hinzugefügt. Fehlersuche Bei Problemen mit dem Switch Click prüfen Sie bitte zuerst, ob die Scanner-Software richtig konfiguriert ist. Eventuell sollten Sie auch die Steuerungssoftware Ihres Computers öffnen, um die Mausfunktionen zu überprüfen. Garantie/réparations/informations pour le renvoi Hinweise zur Garantie/Reparatur/Rücksendung AbleNet offre une garantie limitée de deux ans pour le produit Switch Click. Pour des informations détaillées sur la garantie, aller sur le site www.ablenetinc.com. AbleNet bietet eine zweijährige beschränkte Garantie für das Switch Click Produkt. Ausführliche Garantieinformationen finden Sie auf unserer Website unter www.ablenetinc.com. Pour obtenir de plus amples renseignements sur les produits et services d’AbleNet : AbleNet, Inc., | Minneapolis/St. Paul, MN | 800-322-0956 (États-Unis et Canada) | Internet : www.ablenetinc.com © 2009 AbleNet, Inc. Tous droits réservés Für weitere Informationen zu AbleNet Produkten und Dienstleistungen wenden Sie sich bitte an: AbleNet, Inc., | Minneapolis/St. Paul, MN | 800-322-0956 (USA und Kanada) | Internet: www.ablenetinc.com © 2009 AbleNet, Inc. Alle Rechte vorbehalten
