external volume adjustment for the model 350 vibratory horn
Anuncio
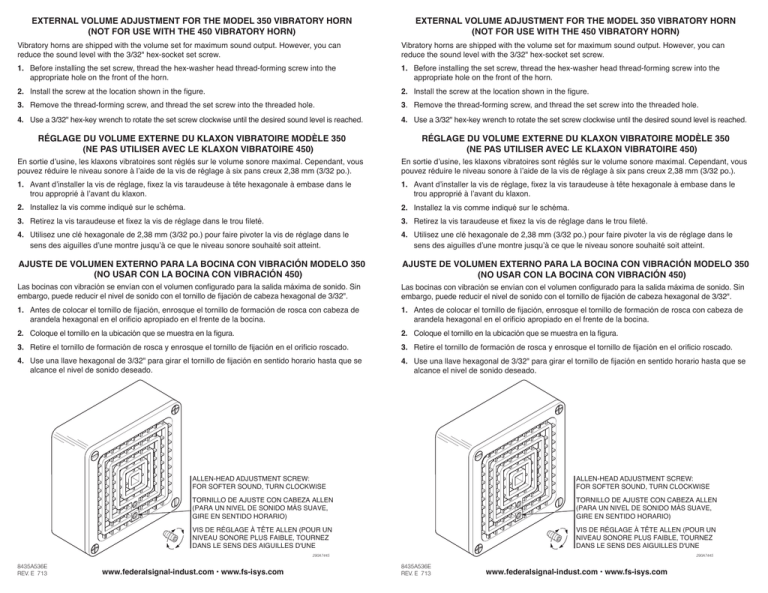
EXTERNAL VOLUME ADJUSTMENT FOR THE MODEL 350 VIBRATORY HORN (NOT FOR USE WITH THE 450 VIBRATORY HORN) EXTERNAL VOLUME ADJUSTMENT FOR THE MODEL 350 VIBRATORY HORN (NOT FOR USE WITH THE 450 VIBRATORY HORN) Vibratory horns are shipped with the volume set for maximum sound output. However, you can reduce the sound level with the 3/32" hex‑socket set screw. Vibratory horns are shipped with the volume set for maximum sound output. However, you can reduce the sound level with the 3/32" hex‑socket set screw. 1. Before installing the set screw, thread the hex-washer head thread‑forming screw into the appropriate hole on the front of the horn. 1. Before installing the set screw, thread the hex-washer head thread‑forming screw into the appropriate hole on the front of the horn. 2. Install the screw at the location shown in the figure. 2. Install the screw at the location shown in the figure. 3. Remove the thread-forming screw, and thread the set screw into the threaded hole. 3. Remove the thread-forming screw, and thread the set screw into the threaded hole. 4. Use a 3/32" hex-key wrench to rotate the set screw clockwise until the desired sound level is reached. 4. Use a 3/32" hex-key wrench to rotate the set screw clockwise until the desired sound level is reached. RÉGLAGE DU VOLUME EXTERNE DU KLAXON VIBRATOIRE MODÈLE 350 (NE PAS UTILISER AVEC LE KLAXON VIBRATOIRE 450) RÉGLAGE DU VOLUME EXTERNE DU KLAXON VIBRATOIRE MODÈLE 350 (NE PAS UTILISER AVEC LE KLAXON VIBRATOIRE 450) En sortie d’usine, les klaxons vibratoires sont réglés sur le volume sonore maximal. Cependant, vous pouvez réduire le niveau sonore à l’aide de la vis de réglage à six pans creux 2,38 mm (3/32 po.). En sortie d’usine, les klaxons vibratoires sont réglés sur le volume sonore maximal. Cependant, vous pouvez réduire le niveau sonore à l’aide de la vis de réglage à six pans creux 2,38 mm (3/32 po.). 1. Avant d’installer la vis de réglage, fixez la vis taraudeuse à tête hexagonale à embase dans le trou approprié à l’avant du klaxon. 1. Avant d’installer la vis de réglage, fixez la vis taraudeuse à tête hexagonale à embase dans le trou approprié à l’avant du klaxon. 2. Installez la vis comme indiqué sur le schéma. 2. Installez la vis comme indiqué sur le schéma. 3. Retirez la vis taraudeuse et fixez la vis de réglage dans le trou fileté. 3. Retirez la vis taraudeuse et fixez la vis de réglage dans le trou fileté. 4. Utilisez une clé hexagonale de 2,38 mm (3/32 po.) pour faire pivoter la vis de réglage dans le sens des aiguilles d’une montre jusqu’à ce que le niveau sonore souhaité soit atteint. 4. Utilisez une clé hexagonale de 2,38 mm (3/32 po.) pour faire pivoter la vis de réglage dans le sens des aiguilles d’une montre jusqu’à ce que le niveau sonore souhaité soit atteint. AJUSTE DE VOLUMEN EXTERNO PARA LA BOCINA CON VIBRACIÓN MODELO 350 (NO USAR CON LA BOCINA CON VIBRACIÓN 450) AJUSTE DE VOLUMEN EXTERNO PARA LA BOCINA CON VIBRACIÓN MODELO 350 (NO USAR CON LA BOCINA CON VIBRACIÓN 450) Las bocinas con vibración se envían con el volumen configurado para la salida máxima de sonido. Sin embargo, puede reducir el nivel de sonido con el tornillo de fijación de cabeza hexagonal de 3/32". Las bocinas con vibración se envían con el volumen configurado para la salida máxima de sonido. Sin embargo, puede reducir el nivel de sonido con el tornillo de fijación de cabeza hexagonal de 3/32". 1. Antes de colocar el tornillo de fijación, enrosque el tornillo de formación de rosca con cabeza de arandela hexagonal en el orificio apropiado en el frente de la bocina. 1. Antes de colocar el tornillo de fijación, enrosque el tornillo de formación de rosca con cabeza de arandela hexagonal en el orificio apropiado en el frente de la bocina. 2. Coloque el tornillo en la ubicación que se muestra en la figura. 2. Coloque el tornillo en la ubicación que se muestra en la figura. 3. Retire el tornillo de formación de rosca y enrosque el tornillo de fijación en el orificio roscado. 3. Retire el tornillo de formación de rosca y enrosque el tornillo de fijación en el orificio roscado. 4. Use una llave hexagonal de 3/32" para girar el tornillo de fijación en sentido horario hasta que se alcance el nivel de sonido deseado. 4. Use una llave hexagonal de 3/32" para girar el tornillo de fijación en sentido horario hasta que se alcance el nivel de sonido deseado. ALLEN-HEAD ADJUSTMENT SCREW: FOR SOFTER SOUND, TURN CLOCKWISE ALLEN-HEAD ADJUSTMENT SCREW: FOR SOFTER SOUND, TURN CLOCKWISE TORNILLO DE AJUSTE CON CABEZA ALLEN (PARA UN NIVEL DE SONIDO MÁS SUAVE, GIRE EN SENTIDO HORARIO) TORNILLO DE AJUSTE CON CABEZA ALLEN (PARA UN NIVEL DE SONIDO MÁS SUAVE, GIRE EN SENTIDO HORARIO) VIS DE RÉGLAGE À TÊTE ALLEN (POUR UN NIVEAU SONORE PLUS FAIBLE, TOURNEZ DANS LE SENS DES AIGUILLES D'UNE VIS DE RÉGLAGE À TÊTE ALLEN (POUR UN NIVEAU SONORE PLUS FAIBLE, TOURNEZ DANS LE SENS DES AIGUILLES D'UNE 290A7445 8435A536E REV. E 713 www.federalsignal-indust.com • www.fs-isys.com 290A7445 8435A536E REV. E 713 www.federalsignal-indust.com • www.fs-isys.com
