installation instructions for tc810e1032 output module
Anuncio
INSTALLATION INSTRUCTIONS
FOR TC810E1032 OUTPUT MODULE
This manual is intended as a quick reference installation guide. Please refer to the control panel
manufacturers installation manual for detailed system information
GENERAL INFORMATION
The M200 series of modules are a family of microprocessor controlled interface devices permitting
the monitoring and/or control of auxiliary devices.
SPECIFICATIONS
Operating Voltage Range
15 to 30VDC (Min 17.5VDC to ensure LED
operation)
Maximum Standby Current
No Communications
310µA
Communication with LED enabled
510µA
LED Current (Red)
2.2mA
LED Current (Yellow)
8.8mA
Operating Temperature
-20°C to 60°C
Humidity
5% to 95% Relative Humidity
Module Dimensions
93mm(H) x 94mm(W) x 23mm(D)
Surface Mount Box Dimensions
132mm(H) x 137mm(W) x 40mm(D)
Weight (Module Only)
85 g
Weight (Module and M200E-SMB)
227 g
Maximum Wire Gauge
2.5mm²
INSTALLATION
Note: These modules must only be connected to control panels using compatible proprietary
analogue addressable communication protocols for monitoring and control.
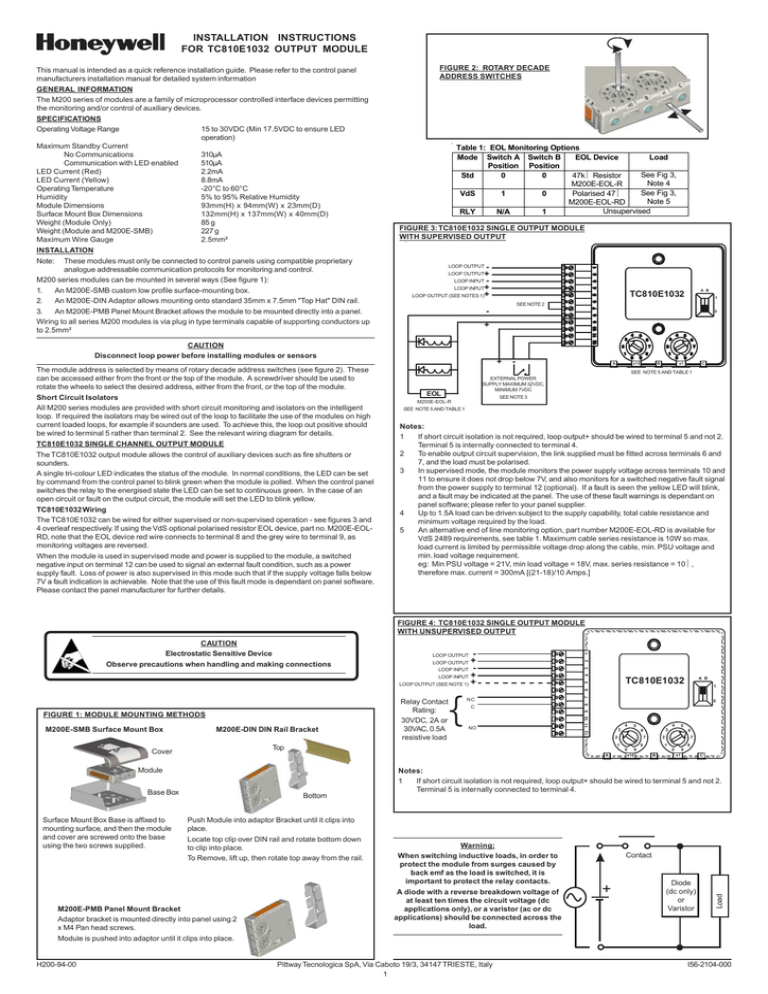
M200 series modules can be mounted in several ways (See figure 1):
1.
An M200E-SMB custom low profile surface-mounting box.
2.
An M200E-DIN Adaptor allows mounting onto standard 35mm x 7.5mm "Top Hat" DIN rail.
3.
An M200E-PMB Panel Mount Bracket allows the module to be mounted directly into a panel.
Wiring to all series M200 modules is via plug in type terminals capable of supporting conductors up
to 2.5mm²
FIGURE 2: ROTARY DECADE
ADDRESS SWITCHES
Table 1: EOL Monitoring Options
Mode Switch A Switch B
EOL Device
Load
Position Position
See Fig 3,
Std
0
0
47kΩ Resistor
Note 4
M200E-EOL-R
See Fig 3,
VdS
1
0
Polarised 47Ω
Note 5
M200E-EOL-RD
Unsupervised
RLY
N/A
1
FIGURE 3: TC810E1032 SINGLE OUTPUT MODULE
WITH SUPERVISED OUTPUT
+
LOOP INPUT+
LOOP OUTPUT (SEE NOTES 1)+
LOOP OUTPUT
LOOP OUTPUT
LOOP INPUT
1
-
0
+
CAUTION
Disconnect loop power before installing modules or sensors
The module address is selected by means of rotary decade address switches (see figure 2). These
can be accessed either from the front or the top of the module. A screwdriver should be used to
rotate the wheels to select the desired address, either from the front, or the top of the module.
Short Circuit Isolators
All M200 series modules are provided with short circuit monitoring and isolators on the intelligent
loop. If required the isolators may be wired out of the loop to facilitate the use of the modules on high
current loaded loops, for example if sounders are used. To achieve this, the loop out positive should
be wired to terminal 5 rather than terminal 2. See the relevant wiring diagram for details.
TC810E1032 SINGLE CHANNEL OUTPUT MODULE
The TC810E1032 output module allows the control of auxiliary devices such as fire shutters or
sounders.
A single tri-colour LED indicates the status of the module. In normal conditions, the LED can be set
by command from the control panel to blink green when the module is polled. When the control panel
switches the relay to the energised state the LED can be set to continuous green. In the case of an
open circuit or fault on the output circuit, the module will set the LED to blink yellow.
TC810E1032 Wiring
The TC810E1032 can be wired for either supervised or non-supervised operation - see figures 3 and
4 overleaf respectively. If using the VdS optional polarised resistor EOL device, part no. M200E-EOLRD, note that the EOL device red wire connects to terminal 8 and the grey wire to terminal 9, as
monitoring voltages are reversed.
When the module is used in supervised mode and power is supplied to the module, a switched
negative input on terminal 12 can be used to signal an external fault condition, such as a power
supply fault. Loss of power is also supervised in this mode such that if the supply voltage falls below
7V a fault indication is achievable. Note that the use of this fault mode is dependant on panel software.
Please contact the panel manufacturer for further details.
A B
TC810E1032
SEE NOTE 2
+
-
A
x10
B
x1
C
SEE NOTE 5 AND TABLE 1
EXTERNAL POWER
SUPPLY MAXIMUM 32VDC,
MINIMUM 7VDC
EOL
SEE NOTE 3
M200E-EOL-R
SEE NOTE 5 AND TABLE 1
Notes:
1
If short circuit isolation is not required, loop output+ should be wired to terminal 5 and not 2.
Terminal 5 is internally connected to terminal 4.
2
To enable output circuit supervision, the link supplied must be fitted across terminals 6 and
7, and the load must be polarised.
3
In supervised mode, the module monitors the power supply voltage across terminals 10 and
11 to ensure it does not drop below 7V, and also monitors for a switched negative fault signal
from the power supply to terminal 12 (optional). If a fault is seen the yellow LED will blink,
and a fault may be indicated at the panel. The use of these fault warnings is dependant on
panel software; please refer to your panel supplier.
4
Up to 1.5A load can be driven subject to the supply capability, total cable resistance and
minimum voltage required by the load.
5
An alternative end of line monitoring option, part number M200E-EOL-RD is available for
VdS 2489 requirements, see table 1. Maximum cable series resistance is 10W so max.
load current is limited by permissible voltage drop along the cable, min. PSU voltage and
min. load voltage requirement.
eg: Min PSU voltage = 21V, min load voltage = 18V, max. series resistance = 10Ω,
therefore max. current = 300mA [(21-18)/10 Amps.]
M200E-SMB Surface Mount Box
M200E-DIN DIN Rail Bracket
2
3
4
5
6
C
NO
0
4
Bottom
Push Module into adaptor Bracket until it clips into
place.
Locate top clip over DIN rail and rotate bottom down
to clip into place.
To Remove, lift up, then rotate top away from the rail.
M200E-PMB Panel Mount Bracket
Adaptor bracket is mounted directly into panel using 2
x M4 Pan head screws.
Module is pushed into adaptor until it clips into place.
4
5
3
7
6
1
8
2
8
0 9
x10
5
3
6
2
A
Base Box
1
7
NC
8
{
Relay Contact
Rating:
30VDC, 2A or
30VAC, 0.5A
resistive load
A B
TC810E1032
1
Module
H200-94-00
LOOP INPUT
Top
Cover
Surface Mount Box Base is affixed to
mounting surface, and then the module
and cover are screwed onto the base
using the two screws supplied.
LOOP OUTPUT
7
9
0
B
x1
C
Notes:
1
If short circuit isolation is not required, loop output+ should be wired to terminal 5 and not 2.
Terminal 5 is internally connected to terminal 4.
Warning:
When switching inductive loads, in order to
protect the module from surges caused by
back emf as the load is switched, it is
important to protect the relay contacts.
A diode with a reverse breakdown voltage of
at least ten times the circuit voltage (dc
applications only), or a varistor (ac or dc
applications) should be connected across the
load.
Pittway Tecnologica SpA, Via Caboto 19/3, 34147 TRIESTE, Italy
1
Contact
+
Diode
(dc only)
or
Varistor
Load
FIGURE 1: MODULE MOUNTING METHODS
+
LOOP INPUT +
LOOP OUTPUT (SEE NOTE 1) +
LOOP OUTPUT
12 11 10 9
CAUTION
Electrostatic Sensitive Device
Observe precautions when handling and making connections
1
FIGURE 4: TC810E1032 SINGLE OUTPUT MODULE
WITH UNSUPERVISED OUTPUT
I56-2104-000
ISTRUZIONI PER L'INSTALLAZIONE
DEL MODULO DI USCITA TC810E1032
TABELLA 1: OPZIONI DI MONITORAGGIO DI FINE LINEA
Modalità Posizione Posizione Dispositivo di
Carico
switch A switch B
fine linea
Std
0
0
VdS
1
0
RLY
N/A
1
FIGURA 3: MODULO CON USCITA SINGOLA TC810E1032
CON USCITA SUPERVISIONATA
USCITA LOOP
USCITA LOOP
INGRESSO LOOP
INGRESSO LOOP
USCITA LOOP (VED. NOTE 1.)
+
+
+
Scatola M200E-SMB per montaggio su superficie
Staffa per binario DIN M200E-DIN
COPERCHIO
0
+
+
-
A
SCATOLA DELLA
BASE
La base della scatola per montaggio su
superficie viene fissata sulla superficie
di montaggio, quindi il modulo e il
coperchio vengono avvitati sulla base
utilizzando le due viti fornite in dotazione.
PARTE INFERIORE
Inserire il modulo nella staffa dell'adattatore
fino allo scatto in posizione.
Posizionare la clip superiore sul binario DIN
e ruotare la parte inferiore verso il basso fino
allo scatto in posizione.
Per rimuoverla, sollevare e quindi ruotare la
parte superiore estraendola dal binario.
Staffa per montaggio sul pannello M200E-PMB
La staffa dell'adattatore viene montata direttamente sul
pannello utilizzando 2 viti a testa orientabile M4.
Il modulo viene inserito all'interno dell'adattatore fino
allo scatto in posizione.
H200-94-00
x10
B
x1
C
VED. NOTA 4 E TABELLA 1
ALIMENTAZIONE ESTERNA
MASSIMA 32 V CC, MINIMA
7 V CC.
EOL
VED. NOTA 3.
M200-EOL-R
VED. NOTA 4 E
TABELLA 1
Note:
1.
Se non è richiesto alcun isolamento da corto circuito, collegare l'uscita loop + al morsetto 5
e non al 2. Il morsetto 5 è collegato internamente al morsetto 4.
2.
Per abilitare la supervisione del circuito di uscita, è necessario stabilire il collegamento tra
i morsetti 6 e 7 e il carico deve essere polarizzato.
3.
In modalità di supervisione, il modulo monitora la tensione di alimentazione tra i morsetti 10
e 11 affinché non scenda al di sotto di 7 V e controlla anche un eventuale segnale di guasto
negativo attivato dall'alimentazione al morsetto 12 (opzionale). In presenza di un guasto, il
LED giallo lampeggia. Un guasto può essere visualizzato anche su pannello. L'uso delle
indicazioni di guasto dipende dal software della centrale di controllo, contattarne il
costruttore.
4.
E' possibile pilotare fino a 1.5A di carico presupponendo però l'idoneità dell'alimentatore
esterno, della resistenza totale del cablaggio e della minima tensione di lavoro del dato
utilizzatore.
5.
Un dispositivo di file linea opzionale, codice M200E-EOL-RD, è adatto ad incontrare i
requisiti VdS 2489, vedi tabella 1. La resistenza massima in serie dei cavi è di 10W quindi
la corrente di carico max. è limitata da un'accettabile caduta di tensione lungo il cavo,
requisito min. della tensione PSU e tensione di carico min. Ad es.: Tensione PSU min.=21V,
tensione di carico min.=18V, max. resistenza in serie= 10Ω, pertanto corrente max. =[(2118)/10]A=300mA
+
INGRESSO LOOP +
USCITA LOOP (VED. NOTA 1.) +
A B
1
2
6
5
TC810E1032
NC
C
NO
7
{
Caratteristiche
contatti relè:
30VDC, 2A o
30VAC, 0,5A
(Carico
resistivo)
4
USCITA LOOP
INGRESSO LOOP
3
1
FIGURA 4: MODULO CON USCITA SINGOLA TC810E1032
CON USCITA NON SUPERVISIONATA
0
4
4
5
3
7
1
6
1
8
2
8
0 9
x10
5
3
6
2
A
MODULO
1
-
7
9
0
B
x1
C
Note:
1.
Se non è richiesto alcun isolamento da corto circuito, collegare l'uscita loop + al morsetto 5
e non al 2. Il morsetto 5 è collegato internamente al morsetto 4.
ATTENZIONE
Nella commutazione di carichi induttivi, per
proteggere il modulo da picchi di tensione
è importante proteggere i contatti del relè.
Nelle applicazioni in corrente continua
applicare un diodo con tensione di
breakdown al massimo di dieci volte la
tensione del circuito mentre nelle
applicazioni in corrente sia continua che
alternata utilizzare un varistore.
Pittway Tecnologica SpA, Via Caboto 19/3, 34147 TRIESTE, Italy
2
Contatti
+
Diodo o
Varistore
Carico
FIGURA 1: METODI DI MONTAGGIO DEL MODULO
A B
TC810E1032
VED. NOTA 2.
USCITA LOOP
ATTENZIONE
Dispositivo sensibile alle scariche elettrostatiche
Effettuare i collegamenti e maneggiare con cautela
Resistenza 47 kΩ Ved. Nota 4
M200E-EOL-R
47Ω polarizzato Ved. Nota 5
M200E-EOL-RD
Non supervisionato
8
ATTENZIONE
Prima di installare i moduli o i sensori, scollegare l'alimentazione del circuito
L'indirizzo del modulo viene scelto per mezzo di switch rotativi per indirizzamento decimale (ved.
figura 2). A questi è possibile accedere dalla parte anteriore o superiore del modulo. Utilizzare un
cacciavite per girare le ruote e quindi selezionare l'indirizzo desiderato dalla parte anteriore o da
quella superiore del modulo.
Isolatori di corto circuito
Tutti i moduli della serie M200 sono dotati di un dispositivo di monitoraggio e di isolatori di corto
circuito sul loop intelligente. Se necessario, è possibile cablare gli isolatori al loop in modo da
agevolare l'utilizzo dei moduli in loop ad alta corrente se, ad esempio, si utilizzano avvisatori
acustici. A questo scopo, cablare l'uscita loop positiva al morsetto 5 anziché al morsetto 2. Per
maggiori dettagli ved. lo schema di cablaggio.
MODULO DI USCITA A CANALE SINGOLO TC810E1032
Il modulo di uscita TC810E1032 consente di controllare dispositivi ausiliari quali dispositivi
antincendio o avvisatori acustici.
Un singolo LED tricolore indica lo stato del modulo. In condizioni normali, è possibile impostare il
LED con un comando dal pannello di controllo affinché lampeggi di luce verde ogniqualvolta il modulo
viene interrogato. Quando il pannello di controllo attiva il relè in stato energizzato, è possibile
impostare il LED su una luce verde fissa. In caso di un circuito aperto o di guasto al circuito di
uscita, il modulo imposta il LED affinché lampeggi di luce gialla.
Cablaggio del modello TC810E1032
È possibile cablare il modello TC810E1032 affinché funzioni in modalità di supervisione o di non
supervisione - ved. rispettivamente le figure 3 e 4 sul retro. In caso venga utilizzato il dispositivo di
fine linea polarizzato, codice M200E-EOL-RD, si noti che, siccome la supervisione avviene a
polarità rovesciata, il filo rosso deve essere collegato al terminale 8 mentre quello grigio al terminale
9.
Quando il modulo è utilizzato in modalità di supervisione ed è collegato ad una fonte di
alimentazione, è possibile utilizzare il terminale 12, un ingresso a negativo commutato, per attivare
una segnalazione di guasto, quale per esempio il malfunzionamento dell'alimentatorè esterno. La
tensione di alimentazione esterna viene comunque monitorata del modulo che, in caso ne identifichi
un livello inferiore a 7V, provvederà a segnalare la situazione di guasto. Si noti che l'uso di questa
modalità dipende dal software della centrale di controllo, contattarne il costruttore.
FIGURA 2: SWITCH ROTATIVI PER
INDIRIZZAMENTO DECIMALE
12 11 10 9
Il presente manuale è stato concepito come guida all'installazione di rapida consultazione. Per
informazioni dettagliate sul sistema, consultare il manuale di installazione fornito in dotazione dal
produttore del pannello di controllo
INFORMAZIONI GENERALI
I moduli della serie M200 sono una famiglia di dispositivi di interfaccia controllati da un
microprocessore che consente di monitorare e/o controllare dispositivi ausiliari.
SPECIFICHE
Range tensione operativa
da 15 a 30 V CC (17,5 Vcc per funzionamento del
LED)
Massima corrente di standby
Nessuna comunicazione
310µA
Comunicazione con LED abilitato
510µA
LED corrente (rosso)
2,2 mA
LED corrente (giallo)
8,8 mA
Temperatura di servizio
da -20°C a 60°C
Umidità
Umidità relativa compresa tra il 5% e il 95%
Dimensioni del modulo
93 mm (A) x 94 mm (L) x 23 mm (P)
Dimensioni della scatola per montaggio su superficie
132 mm (A) x 137 mm (L) x 40 mm (P)
Peso (Solo modulo)
85 gr.
Peso (Modulo e M200E-SMB)
227 gr.
Massimo calibro del filo
2,5 mm²
INSTALLAZIONE
Nota: Questi moduli possono essere collegati esclusivamente a pannelli di controllo dotati di
opportuno protocollo di comunicazione proprietario, indirizzabile ed analogico, compatibile
con funzioni di monitoraggio e controllo.
I moduli della serie M200 possono essere montati in diversi modi (ved. figura 1):
1.
Una scatola M200E-SMB con montaggio su superficie personalizzato a basso profilo.
2.
Un adattatore M200E-DIN consente il montaggio su binario DIN "Top Hat" standard da 35 mm
x 7,5 mm.
3.
Una staffa di montaggio del pannello M200E-PMB consente di montare il modulo direttamente
su un pannello.
Per quanto riguarda il cablaggio, tutti i moduli della serie M200 utilizzano morsetti di tipo a spina, in
grado di supportare conduttori fino a 2,5 mm²
I56-2104-000
INSTRUCCIONES PARA LA
INSTALACIÓN DE LOS MÓDULOS
DE SALIDA TC810E1032
FIGURA 2: SELECTORES DE
DIRECCIÓN GIRATORIOS Y
DECÁDICOS
Tabla 1: Opciones de supervisión de final de línea
MODO
Posición Posición Equipo de final
Carga
Selector A selector B
de línea
Estándar
0
0
Resistencia 47kΩ Ver Nota 4
M200E-EOL-R
Vds
1
0
47Ω polarizados Ver Nota 5
M200E-EOL-RD
Relé
N/A
1
Sin supervisión
FIGURA 3: MÓDULO DE SALIDA ÚNICA TC810E1032
CON SALIDA SUPERVISADA
+
ENTRADA DEL LAZO+
SALIDA DEL LAZO (VER NOTA 1)+
SALIDA DEL LAZO
SALIDA DEL LAZO
ENTRADA DEL LAZO
0
+
+
-
Caja para montaje en superficie M200E-SMB
Soporte M200E-DIN para rieles DIN
TAPA
BASE
La base de la caja para montaje en
superficie se fija a la superficie de
montaje y, a continuación, el módulo y la
tapa se atornillan a la base utilizando los
dos tornillos suministrados.
PARTE INFERIOR
Empuje el módulo contra el soporte adaptador hasta
que quede bien sujeto.
Coloque la sujeción superior encima del riel DIN y
gire la parte inferior hacia abajo hasta que encaje.
Para desmontarlo, levante y gire la parte superior
para separarla del riel.
Soporte de montaje en panel M200E-PMB
El soporte adaptador se monta directamente en el panel
con 2 tornillos M4 de cabeza ancha.
El módulo se empuja contra el adaptador hasta que
quede bien sujeto.
H200-94-00
B
x1
C
VER NOTA 5 Y TABLA 1
EOL
VER NOTA 3
M200-EOL-R
VER NOTA 5 Y TABLA 1
Notas:
1. Si no se necesita el aislamiento de cortocircuitos, se debe conectar la salida + del lazo al
terminal 5 en vez de al terminal 2. El terminal 5 está conectado internamente con el terminal
4.
2. Para que sea posible supervisar el circuito de salida, es necesario realizar un puente con el
cable suministrado entre los terminales 6 y 7, y la carga debe estar polarizada.
3. En modo supervisado, el módulo controla la tensión de la fuente de alimentación en los
terminales 10 y 11 para garantizar que no caiga por debajo de 7V. También detecta una señal
negativa conmutada de avería que va desde la fuente de alimentación hasta el terminal 12
(opcional). Si se detecta una avería, el LED amarillo parpadea y el panel puede indicar la
avería. El uso de estas indicaciones de avería depende de la versión de software del panel.
Póngase en contacto con su suministrador.
4. Se puede controlar una carga de hasta 1,5 A, dependiendo de la capacidad de la alimentación,
resistencia del cable y tensión mínima requerida por la carga.
5. Existe una opción alternativa de supervisión de final de línea, ref.: M200E-EOL-RD, para
cumplir con los requisitos de VdS 2489 (ver tabla 1). La resistencia en serie máxima del cable
es 10W, por lo que la corriente de carga máxima está limitada por la caída permitida de la
tensión a lo largo del cable, la tensión mínima de alimentación y la tensión de carga mínima.
Por ejemplo: Tensión mínima de alimentación = 21 V, tensión de carga mínima = 18 V,
resistencia en serie máxima = 10Ω, por lo tanto la corriente máxima = 300 mA [(21-18)/10 A].
+
ENTRADA DEL LAZO +
SALIDA DEL LAZO (VER +
1
2
C
NO
5
7
{
NC
0
8
Contactos de
relé:
30 Vdc 2 A o
30 Vac 0,5 A
(Carga
resistiva)
A B
TC810E1032
6
NOTA 1)
4
SALIDA DEL LAZO
ENTRADA DEL LAZO
3
1
FIGURA 4: MÓDULO DE SALIDA ÚNICA TC810E1032
CON SALIDA NO SUPERVISADA
4
4
5
3
7
1
6
1
8
2
8
0 9
x10
5
3
6
2
A
MÓDULO
x10
7
9
0
B
x1
C
Nota:
1.
Si no se necesita el aislamiento de cortocircuitos, se debe conectar la salida + del lazo al
terminal 5 en vez de al terminal 2. El terminal 5 está conectado internamente con el
terminal 4.
AVISO
Si se conectan cargas inductivas y con el fin
de proteger el módulo de sobrecargas
causadas por picos de retorno al conectar la
carga, es importante proteger los contactos
de relé.
Se debe conectar a través de la carga un
diodo con tensión de ruptura invertida de,
como mínimo, diez veces la tensión del
circuito (solo para aplicaciones de corriente
continua 'dc'), o bien una varistor (para
aplicaciones de corriente alterna 'ac' y
continua 'dc').
Pittway Tecnologica SpA, Via Caboto 19/3, 34147 TRIESTE, Italy
3
CONTACTOS
+
DIODO
(SOLO DC) O
VARISTOR
CARGA
FIGURA 1: MÉTODOS DE MONTAJE DEL MÓDULO
A
ALIMENTACIÓN
EXTERNA A MÁXIMA 32
VCC., MÍNIMA 7 VCC.
SALIDA DEL LAZO
PRECAUCIÓN
Equipo sensible a la electricidad estática.
Tome las precauciones necesarias al manejar el equipo y hacer las
conexiones.
1
-
PRECAUCIÓN
Desconecte la alimentación del lazo antes de instalar módulos o sensores
La dirección del módulo se selecciona por medio de selectores de dirección giratorios y decádicos
(figura 2) a los que se accede desde la parte delantera o superior del módulo. Hay que utilizar un
destornillador para girar los selectores y elegir la dirección deseada.
En los módulos que tienen más de un canal, la dirección seleccionada será la del primer canal de
entrada. El módulo asignará automáticamente la dirección o las dos direcciones siguientes, según el
caso, al segundo canal de entrada y al canal de salida. Como resultado, la dirección 99 no es válida
para módulos con dos canales, y las direcciones 98 y 99 no son válidas para módulos con tres
canales. El módulo no responderá si se seleccionan estas direcciones.
Aisladores de cortocircuitos
Todos los módulos de la serie M200 incluyen supervisión y aislamiento de cortocircuitos en el lazo
analógico. Si es necesario, se pueden eliminar por conexionado los aisladores para facilitar el uso
de los módulos en lazos de alta corriente, por ejemplo cuando se utilizan sirenas. Para ello, hay que
conectar la salida positiva del lazo al terminal 5 en vez de al terminal 2. Si desea información más
detallada, consulte los diagramas de conexión correspondientes.
MÓDULO DE SALIDA DE UN SOLO CANAL TC810E1032
El módulo de salida TC810E1032 permite controlar dispositivos auxiliares, como puertas cortafuego
o sirenas.
El estado del módulo se indica con un solo LED de tres colores. En condiciones normales, desde el
panel, se puede configurar para que el led verde parpadee cuando se interrogue el módulo. Si el
panel de control activa el relé, se puede fijar el LED para que permanezca encendido en verde. En
caso de circuito abierto o de avería en el circuito de salida, el módulo hará que el LED parpadee en
amarillo.
Conexiones del TC810E1032
El TC810E1032 se puede conectar para que funcione con o sin supervisión (consulte las figuras 3 y
4). Si se utiliza la resistencia de final de línea polarizada y opcional según VdS, ref.: M200E-EOLRD, obsérvese que el cable rojo va conectado al terminal 8 y el cable gris al terminal 9, ya que se
invierten las tensiones de supervisión.
Cuando el módulo se utiliza en modo supervisado y con alimentación, se puede utilizar una entrada
negativa conmutada en el terminal 12 para indicar una avería externa, como un fallo de
alimentación. En este modo, también se supervisa la pérdida de alimentación, de manera que si la
tensión cae por debajo de 7V, se indica una avería. Obsérvese que el uso de este modo de avería
depende de la versión de software del panel. Póngase en contacto con el fabricante.
A B
TC810E1032
VER NOTA 2
12 11 10 9
Este manual ha sido preparado para que sirva como guía de referencia rápida en la instalación. Si
desea información más detallada, consulte el manual de instalación del fabricante del panel de
control.
INFORMACIÓN GENERAL
La serie de módulos M200 es una gama de dispositivos de interfaz controlados por microprocesador
que permiten supervisar y/o controlar dispositivos auxiliares.
ESPECIFICACIONES
Tensión de funcionamiento
15 a 30 Vcc. (mín. 17,5 Vcc. para que funcione el
LED)
Corriente máxima en reposo (µA)
Sin comunicación
310µA
Comunicación con LED activado
510µA
Corriente de LED (rojo)
2,2 mA
Corriente de LED (amarillo)
8,8 mA
Temperatura de funcionamiento
-20 °C a 60 °C
Humedad
5% a 95% de humedad relativa
Dimensiones del módulo
93 mm (alto) x 94 mm (ancho) x 23 mm (fondo)
Dimensiones de la caja para montaje en superficie
132 mm (alto) x 137 mm (ancho) x 40
mm (fondo)
Peso (sólo el módulo)
85g
Peso (módulo y M200E-SMB)
227 g
Sección máxima de cable
2,5 mm²
INSTALACIÓN
Nota: Estos módulos sólo se deben conectar a paneles de control utilizando protocolos de
comunicaciones analógicas direccionables compatibles y exclusivos para supervisión y
control.
Los módulos de la serie M200 se pueden montar de distintas formas (figura 1):
1. Una caja para montaje en superficie M200E-SMB de bajo perfil.
2. Un adaptador M200E-DIN que permite el montaje en rieles estándar DIN "Top Hat" de 35 mm x
7,5 mm.
3. Un soporte de montaje en panel M200E-PMB que permite montar el módulo directamente en un
panel.
Las conexiones de todos los módulos de la serie M200 se realizan mediante terminales extraíbles
con capacidad para cables con sección de hasta 2,5 mm²
I56-2104-000
INSTALLATIONSANLEITUNG
FÜR DIE MODULE TC810E1032
ABBILDUNG 2: DREHSCHALTER
ZUR ADRESSEINSTELLUNG
TABLE 1: LINIENABSCHLUSS ÜBERWACHTUNGSOPPTIONEN
Mode Schalter A Schalter B Linienabschluss
Last
Position
Position
Std
0
0
47kΩ Widerstand Siehe Abb. 3,
Hinweis 4
M200E-EOL-R
VdS
1
0
Siehe Abb.
Polarisiert 47Ω
3,
Hinweis 5
M200E-EOL-RD
REL
N/A
1
Nicht überwacht
ABBILDUNG 3: TC810E1032 STEUERMODUL
MIT EINEM ÜBERWACHBAREM AUSGANG
+
RINGLEITUNG EINGANG +
RINGLEITUNG AUSGANG +
RINGLEITUNG AUSGANG
RINGLEITUNG AUSGANG
RINGLEITUNG EINGANG
-
0
+
+
-
SIEHE HINWEIS 3
Hinweis:
1.
Falls die Trennung im Kurzschlussfall nicht erforderlich ist sollte der Ausgang
"Ringleitung+" direkt an Klemme 5 anstatt an Klemme 2 angeschlossen werden. Klemme 5
ist intern direkt mit Klemme 4 verbunden.
2.
Zur Aktivierung der Ausgangsüberwachung muss die mitgelieferte Verbindung zwischen
Klemme 6 und 7 und eine gepolte Last angeschlossen werden.
3.
Im überwachten Betrieb wird die Betriebsspannung zwischen den Klemmen 10 und 11
überwacht und geprüft, dass der Wert 7V nicht unterschritten wird. Zusätzlich wird ein
minusgeschaltetes Störungssignal des Netzteiles an Klemme 12 überwacht (optional) und
im Störungsfall die blinkende gelbe LED sowie die entsprechende Anzeige an der Zentrale
angesteuert. Diese Funktion ist abhängig vom Typ der Brandmelderzentrale
4.
Eine Last von bis zu 1,5A kann geschaltet werden, abhängig von der Spannungsversorgung
und des Kabelwiderstands.
5.
Für die Anforderung der VdS 2489 Richtlinie steht eine Alternative des Linienabschlusses
(Best.-Nr.: M200E-EOL-RD) zur Verfügung (siehe Tabelle 1). Der Strom für die externe
Baugruppe wird durch den Leitungswiderstand von zulässigen max. 10Ohm und dem
Spannungsabfall auf der Leitung zwischen Netzteil und Verbraucher begrenzt. BEISPIEL:
Min Netzteilspannung = 21V, min. Spannung am Verbraucher = 18V, max.
Leitungswiderstand = 10Ω, das ergibt einen max. Strom von = 300mA [(21V-18V)/10 Ohm].
+
RINGLEITUNG EINGANG +
RINGLEITUNG AUSGANG +
2
RINGLEITUNG EINGANG
C
NO
5
0
4
4
5
3
A
Das Rückseite der Montagebox wird an der
Montagefläche befestigt und anschließend
das Modul und die Abdeckung mit den zwei
beigestellten Schrauben an dem
Gehäuserückteil festgeschraubt.
Drücken Sie das Modul in das Adapterstück bis
es einrastet.
Setzen Sie das Adapterstück zuerst oben in die
Schiene ein und drücken es nach unten bis es
einrastet.
Zum Entnehmen etwas anheben und die
Oberseite von der Schiene lösen.
M200E-PMB Adapterstück für die
Zentralenmontage
Das Adapterstück wird direkt mit den 2 x M4
Flachkopfschrauben in dem Zentralengehäuse befestigt.
Das Modul wird in den Adapter gedrückt bis es einrastet.
H200-94-00
7
6
1
8
2
8
0 9
x10
5
3
6
1
UNTEN
1
7
NC
8
{
A B
TC810E1032
6
(SIEHE HINWEIS 1.)
4
RINGLEITUNG AUSGANG
3
1
FIGURE 4: TC810E1032 STEUERMODUL MIT
EINEM NICHT ÜBERWACHTEM AUSGANG
2
GEHÄUSERÜCKTEIL
C
M200-EOL-R
ABDECKUNG
MODUL
x1
SIEHE HINWEIS 5,
TABELLE 1
30VDC, 2A
OHMSCHE LAST
M200E-DIN C-Schienen Montageelement
B
7
9
0
B
x1
C
Hinweis:
1.
Falls die Trennung im Kurzschlussfall nicht erforderlich ist sollte der Ausgang "Ringleitung+"
direkt an Klemme 5 anstatt an Klemme 2 angeschlossen werden. Klemme 5 ist intern direkt
mit Klemme 4 verbunden.
Warnung:
Um das Modul vor Uberspannungen zu
schutzen, wenn induktive Lasten geschaltet
werden,ist es wichtig die Relais-Kontakte
abzusichern.
Eine Diode mit einer Sperrspannung, die
mindestens zehn Mal so hoch ist wie die
Betriebspannung (bei DC-Betrieb) oder ein
Varistor (bei AC+DC-Betrieb) sollte uber die
Last angeschlossen werden.
Pittway Tecnologica SpA, Via Caboto 19/3, 34147 TRIESTE, Italy
4
KONTAKT
+
DIODE
(NUR DCBETRIEB)
ODER
VARISTOR
LAST
M200E-SMB Aufputz-Montagebox
x10
EXTERNES NETZTEIL MAX.
32VDC, MIN. 7VDC
EOL
RELAIS
SCHALTLEISTUNG:
ABBILDUNG 1: MONTAGEMÖGLICHKEITEN
A
SIEHE HINWEIS 5, TABELLE 1
RINGLEITUNG AUSGANG-
ACHTUNG
Elektrostatisch empfindliches Gerat Beachten Sie die Vorschriften fur
den Umgang mit elektrostatisch empfindlichen Geraten
1
SIEHE HINWEIS 2
ACHTUNG
Vor der Installation von Meldern oder Modulen ist die Ringleitung spannungsfrei zu
schalten.
Die Moduladresse wird mit einem geeigneten Schraubendreher an dem Drehschalter eingestellt
(siehe Abb. 2). Dieser kann von der vorne oder der rechten Seite des Moduls erreicht werden.
Bei Modulen mit mehr als einem Ein-/Ausgang, bezieht sich die eingestellte Adresse auf den ersten
Eingang. Die nächste(n) Adresse(n) werden von dem Modul automatisch dem entsprechend Eingang
bzw. Ausgang auf dem Modul zugeordnet. Aus diesem Grund kann die Adresse 99 bei Modulen mit
zwei Ein-/Ausgängen und die Adresse 98 bei Modulen mit 3 Ein-/Ausgängen nicht benutzt werden.
Bei einer Einstellung dieser Adresse erfolgt keine Rückmeldung von diesem Modul.
Isolator
Alle Module der Serie M200 sind mit einer Kurzschlussüberwachung und einem Isolator für die
Ringleitung ausgerüstet. Falls erforderlich können die Isolatoren aus der Verdrahtung
herausgenommen werden, z.B. wenn Signalgeber angeschlossen sind deren Stromversorgung über
die spezielle Ringleitung erfolgt. In diesem Fall sollte der Ausgang "Ringleitung+" direkt an Klemme
5 und nicht an Klemme 2 angeschlossen werden (siehe umseitiges Verdrahtungsdiagramm)
TC810E1032 STEUERMODUL MIT EINEM AUSGANG
Das TC810E1032 Modul ermöglicht die Ansteuerung von externen Baugruppen wie z.B.
Feuerabschlusstüren oder Signalgebern.
Eine 3-farbige LED zeigt den Modulzustand an. Im Normalfall blinkt die grüne LED bei der
Kommunikation mit der Zentrale. Bei einer Ansteuerung des Relaisausganges leuchtet die LED zur
Anzeige dauerhaft grün auf. Im Fall eines Drahtbruches oder einer Störung des Modulausganges
blinkt die gelbe LED
TC810E1032 Verdrahtung
Das Modul TC810E1032 kann für den überwachten oder nicht überwachten Betrieb verdrahtet
werden (siehe hierzu auch Abb. 3 und 4, umseitig). Bei einer Beschaltung gemäß den VdS
Anforderungen beachten Sie das, wegen des Polaritätswechsels der Spannung im Ansteuerfall, der
+Draht der Abschlusseinheit (Best.-Nr.: M200E-EOL-RD) an Klemme 8 und der -Draht an Klemme
9 angeschlossen wird. Der minusgeschaltete Eingang an Klemme 12 kann zur Meldung einer
externen Störung, z.B. für den Störungsmeldekontakt eines externen Netzteiles, genutzt werden. Der
Ausfall der Versorgungsspannung wird ebenfalls überwacht, ebenso wie ein Absinken der Spannung
unter 7V. Die Nutzung dieser Störungsmeldung ist abhängig vom Typ der Brandmelderzentrale.
A B
TC810E1032
(SIEHE HINWEIS 1.)
12 11 10 9
Diese Kurzbedienungsanleitung ermöglicht einen schnellen Überblick zur Installation der Module.
Für detaillierte Informationen lesen Sie bitte in der Installationsanleitung der Brandmelderzentrale.
ALLGEMEINES
Die Module der Serie M200 sind Mikroprozessor gesteuerte Elemente, die eine Überwachung und/
oder Steuerung von externen Baugruppen ermöglichten.
SPEZIFIKATION
Betriebsspannungsbereich:
15 bis 30VDC (Min. 17,5VDC zur LED Ansteuerung)
Max. Ruhestrom
ohne Kommunikation
310µA
Kommunikation mit LED ein
510µA
LED Strom (Rot)
2,2mA
LED Strom (Gelb)
8,8mA
Betriebstemperatur
-20 °C bis 60 °C
Luftfeuchtigkeit
5% bis 95% Rel. Luftfeuchte
Abmessungen Modul
93mm(H) x 94mm(B) x 23mm(T)
Abmessungen aP-Montagebox
132mm(H) x 137mm(B) x 40mm(T)
Gewicht (nur Modul)
85 g
Gewicht (Modul und M200E-SMB)
225 g
Max. Kabelquerschnitt
2,5mm²
INSTALLATION
Hinweis: Diese Module dürfen nur an kompatible Zentralen mit adressierbarer
Ringleitungskommunikation und den geforderten Eigenschaften für die für die Steuerung und
Überwachung angeschlossen werden.
Module der Serie M200 können auf verschiedene Weise montiert werden (Siehe Abb.1):
1.
In der M200E-SMB aP-Montagebox, flache Bauform.
2.
Der M200E-DIN Adapter ermöglicht die Montage auf einem Standard 35mm x 7.5mm CHutschienenprofil.
3.
Das M200E-PMB Adapterstück ermöglicht die Montage direkt im Zentralengehäuse.
Die Verdrahtung der Serie M200 Module erfolgt über die Steckverbinder mit einem Kabelquerschnitt
von max. 2,5mm²
I56-2104-000
