Montaje de acoplamientos UNEFLEX
Anuncio
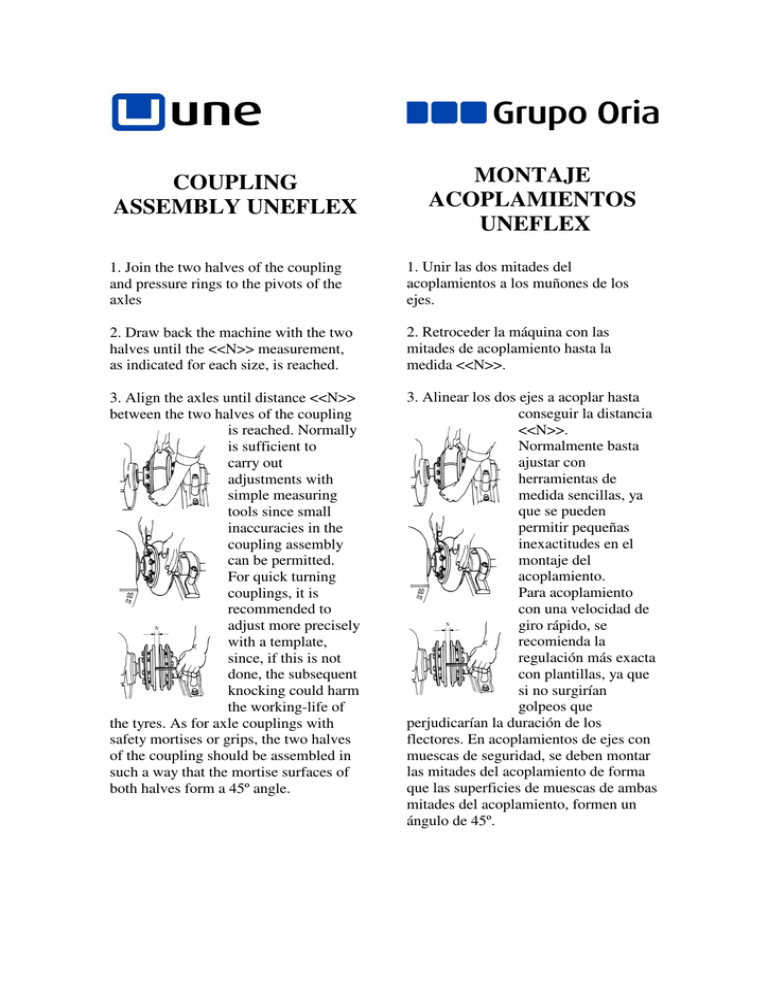
COUPLING ASSEMBLY UNEFLEX MONTAJE ACOPLAMIENTOS UNEFLEX 1. Join the two halves of the coupling and pressure rings to the pivots of the axles 1. Unir las dos mitades del acoplamientos a los muñones de los ejes. 2. Draw back the machine with the two halves until the <<N>> measurement, as indicated for each size, is reached. 2. Retroceder la máquina con las mitades de acoplamiento hasta la medida <<N>>. 3. Align the axles until distance <<N>> between the two halves of the coupling is reached. Normally is sufficient to carry out adjustments with simple measuring tools since small inaccuracies in the coupling assembly can be permitted. For quick turning couplings, it is recommended to adjust more precisely with a template, since, if this is not done, the subsequent knocking could harm the working-life of the tyres. As for axle couplings with safety mortises or grips, the two halves of the coupling should be assembled in such a way that the mortise surfaces of both halves form a 45º angle. 3. Alinear los dos ejes a acoplar hasta conseguir la distancia <<N>>. Normalmente basta ajustar con herramientas de medida sencillas, ya que se pueden permitir pequeñas inexactitudes en el montaje del acoplamiento. Para acoplamiento con una velocidad de giro rápido, se recomienda la regulación más exacta con plantillas, ya que si no surgirían golpeos que perjudicarían la duración de los flectores. En acoplamientos de ejes con muescas de seguridad, se deben montar las mitades del acoplamiento de forma que las superficies de muescas de ambas mitades del acoplamiento, formen un ángulo de 45º. 4. The cut tyres are set on the coupling halves so that the edges of the cut form a channel of 2-10mm., according to coupling size. For large couplings, before tightening the pressure rings, until its thickness is 2/3rds that of its original thickness 5. Screw down the pressure ring so that at the same time two diametrically opposed screws are tightened and pressure is put on the fitted rubber tyre Replacement of tyres: Loosen pressure ring screws until tyre is free. Remove wore tyre. Replace it with a new tyre. Tighten screws. Provide tyres number, clearly marked on each tyre, when ordering replacements. 4. Los flectores cortados están sobre las mitades de acoplamiento de forma que las superficies de corte formen una ranura de 2-10mm., según el tamaño del acoplamiento. Para grandes acoplamientos, antes de apretar los aros de presión, contraer las llantas por medio de cinta de brida. 5. Atornillar los aros de presión de forma que se aprieten a las vez dos tornillos diametralmente opuestos y se presione el espesor de la llanta ajustada en aproximadamente los 2/3 de su espesor no sujeto. Recambio del elemento flexible: Aflojar los tornillos de los aros de presión hasta que quede libre el flector.. Extraer el flector deteriorado. Colocar en su lugar el flector de recambio. Apretar los tornillos. Indiquen la referencia del flector que se encuentra visible en el mismo, cuando pidan repuestos.
