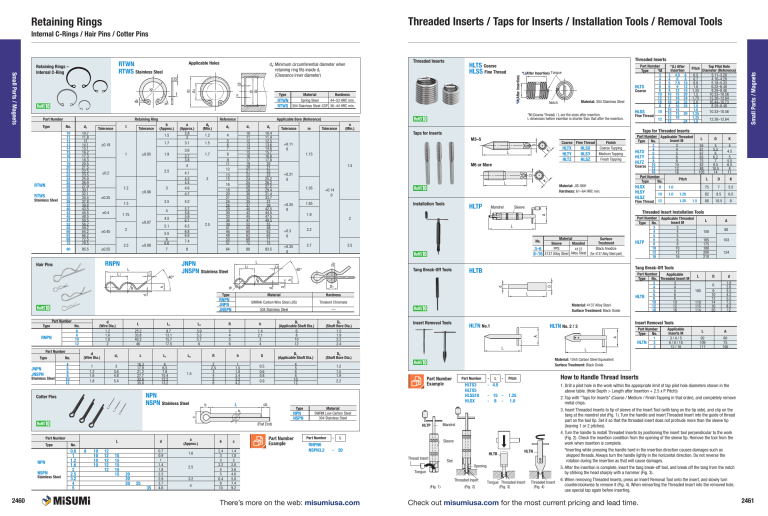
Threaded Inserts / Taps for Inserts / Installation Tools / Removal Tools Retaining Rings Internal C-Rings / Hair Pins / Cotter Pins RNPN JNPN JNSPN Trivalent Chromate 304 Stainless Steel — 25.2 33.8 40.2 46 9.7 13.1 15.7 17.5 3.9 5.3 5.7 6 3 4 5 6 No. L L1 4 5 6 8 10 12 1 1.2 1.6 1.8 3 3.6 4.8 5.4 16.3 17.9 21.2 27.7 32.6 35.8 6 6.5 7.8 10.4 12.2 13.2 L2 R h S D1 (Applicable Shaft Dia.) D2 (Shaft Bore Dia.) 1.5 2 2.5 3 4 5 6 1 1.5 1.8 2.4 3.2 4.2 0.5 0.6 0.8 0.9 4 5 6 8 10 12 1.2 1.5 1.9 2.2 NPN NSPN Stainless Steel L (a) Type NPN NSPN c d b Part Number NSPN Stainless Steel L No. 0.8 1 1.2 1.6 2 2.5 3.2 4 5 8 10 10 10 10 12 12 12 12 12 15 15 15 15 15 d 20 20 20 25 35 0.7 0.9 1 1.4 1.8 2.3 2.9 3.7 4.6 a (Approx.) 1.6 2.5 3.2 4 b c 2.4 3 3 3.2 4 5 6.4 8 10 1.4 1.8 2 2.8 3.6 4.6 5.8 7.4 9.2 D K D RNPN6 NSPN3.2 - L K A L HLTS3 HLTX5 HLSS10 HLSX - L HLTB 1.25 1.0 HLTN Slot Opening Tongue Threaded Insert (Fig. 1) (Fig. 2) 1.5 D K 7 5.5 82 8.5 6.5 88 10.5 8 D Part Number Type No. 3 4 5 6 HLTP 8 10 12 16 Applicable Threaded Insert M 3 4 5 6 8 10 12 16 L A 80 150 165 175 180 200 210 103 124 Tang Break-Off Tools Part Number Applicable Type No. Threaded Insert M 3 3 4 4 5 5 6 6 HLTB 8 8 10 10 12 12 16 16 L 100 110 115 114 D d 6 9 10 12 14 16 20 1.8 2.6 3.5 4.2 5.5 7.5 8.5 12 Part Number Type No. 1 HLTN 2 3 Applicable Inserts M 3/4/5 6 / 8 / 10 12 / 16 L A 92 109 117 60 75 100 How to Handle Thread Inserts - L Pitch Sleeve Thread Insert 1.25 1.25 L 75 Material: 1045 Carbon Steel Equivalent Surface Treatment: Black Oxide Mandrel - 20 4 4.5 5 5.5 6.5 8 11 Insert Removal Tools L L - 4.5 - 15 - 8 - K 5 5.5 6 6.2 7 8.5 10.5 14 A L HLTN No. 2 / 3 L Part Number 1.0 D A D Material: 4137 Alloy Steel Surface Treatment: Black Oxide L L L L L There’s more on the web: misumiusa.com D D K K A d HLTN No.1 L HLTP Part Number K K K K D K K KK D KA A A A L L Insert Removal Tools Small Parts / Magnets *M(After Insertion) D D D D DD D L Material SWRM Low Carbon Steel 304 Stainless Steel (Flat End) NPN L A h 10 12 L 55 61 67 65 75 82 88 105 A D2 (Shaft Bore Dia.) 1.5 1.9 2.2 2.4 R Surface Treatment Black Anodize (for 4137 Alloy Steel part) L AA 1.4 2.1 3 4 D1 (Applicable Shaft Dia.) 6 8 10 12 L2 Cotter Pins Type *M(After Insertion) D Hardness Material Sleeve Mandrel PPS 3–6 4137 L Alloy Steel Alloy Steel 8–16 4137 No. D D1 D1 SWRH6 Carbon Wire Steel (JIS) L1 d1 Stainless Steel L L Material L d (Wire Dia.) JNPN JNSPN HLTB Tang Break-Off Tools L d (Wire Dia.) 1.2 1.6 1.8 2 No. 6 8 10 12 Part Number Type L Tap Pilot Hole Pitch Diameter (Reference) 0.5 3.11–3.20 0.7 4.16–4.29 0.8 5.18–5.33 1.0 6.22–6.40 1.25 8.28–8.48 1.5 10.33–10.56 1.75 12.38–12.64 2.0 16.44–16.73 1.0 8.28–8.48 1.0 10.33–10.56 1.25 1.25 12.38–12.64 1.5 Threaded Insert Installation Tools A RNPN 2.5 Fine Thread L LSleeve L 2.7 *(L) After Insertion 3 4.5 6 4 6 8 5 7.5 10 6 9 12 8 12 16 10 15 20 12 18 24 16 24 32 8 16 24 10 15 10 15 20 12 18 12 24 Part Number Applicable Threaded Insert M Type No. 3 3 4 4 HLTX 5 5 6 6 HLTY 8 8 HLTZ 10 Coarse 10 12 12 16 16 Part Number Pitch Type No. HLSX 8 1.0 HLSY HLSZ Sleeve A Part Number 2.2 Sleeve A Type L Mandrel Mandrel A d1 Sleeve Sleeve L Mandrel 2 40° R Type d d d1 L2 Mandrel L Mandrel HLTP L A h R R 1.9 40° L Sleeve A R L1 L2 Installation Tools 1.65 L Sleeve Material: JIS-SKH Hardness: 61–64 HRC min. A 40° JNPN L L2JNSPN Stainless L1 Steel 40° L Mandrel Mandrel Finish Coarse Tapping Medium Tapping Finish Tapping D L1 83.5 L LL L +0.14 0 HLSX HLSY L HLSZ D L1 L2 80 1.35 +0.35 0 HLTX HLTY HLTZ L L L +0.21 0 +0.3 0 Coarse Fine Thread D L L 64 L M6 or More 1.5 Part Number Type *M 3 4 5 6 HLTS 8 Coarse 10 12 16 8 10 HLSS Fine Thread 12 Taps for Threaded Inserts D 8 L 1.15 +0.25 0 L Notch A 7 Notch M3–5 +0.11 0 Material: 304 Stainless Steel Notch A RNPN ±0.08 2.5 Taps for Inserts d ±0.55 5.5 6 6.6 5.1 2 2.5 4 5.7 5.8 5.9 6.1 6.5 6.8 6.9 7.4 4.5 ±0.07 ±0.45 5.2 n (Min.) Tolerance d 1.75 3.5 2 m d 3 ±0.06 1.5 ±0.4 4.1 4.3 4.4 4.6 4.7 4 5 6 7 8 9 11 12 13 15 16 18 20 21 24 26 28 30 33 34 39 41 46 48 53 57 Tolerance *L(After Insertion) Tongue Notch *M (Coarse Thread) / L are the sizes after insertion. L dimension before insertion is shorter than that after the insertion. d 1.2 ±0.25 1.7 d2 10.4 11.4 12.5 13.6 14.6 15.7 16.8 17.8 20 21 22 23 25.2 26.2 27.2 29.4 31.4 33.7 37 39 42.5 44.5 47.5 49.5 55 58 63 65 71 75 d 2.5 ±0.2 Hair Pins 3.6 3.7 3.8 4 1.9 ±0.05 1.5 d1 10 11 12 13 14 15 16 17 19 20 21 22 24 25 26 28 30 32 35 37 40 42 45 47 52 55 60 62 68 72 D2 1 1.2 d4 D2 1.7 ±0.18 d0 (Min.) Notch Notch h 1.5 a (Approx.) 2.8 3 3.1 *L(After Insertion) Tongue d a b (Approx.) S 85.5 Tolerance *L(After Insertion) Tongue *L(After Insertion) Tongue Notch Applicable Bore (Reference) d 80 t Tolerance Hardness h 10.7 11.8 13 14.1 15.1 16.2 17.3 18.3 20.5 21.5 22.5 23.5 25.9 26.9 27.9 30.1 32.1 34.4 37.8 39.8 43.5 45.5 48.5 50.5 56.2 59.2 64.2 66.2 72.5 76.5 Material S Stainless Steel d3 10 11 12 13 14 15 16 17 19 20 21 22 24 25 26 28 30 32 35 37 40 42 45 47 52 55 60 62 68 72 Reference h RTWS No. Type *L(After Insertion) Tongue *L(After Insertion) Tongue *L(After Insertion) Tongue Spring Steel 44–53 HRC min. RTWN RTWS 304 Stainless Steel-CSP 36–44 HRC min. Retaining Ring Type d1 d2 d2 d4 n d Part Number RTWN 2460 *M(After Insertion) *M(After Insertion) *M(After Insertion) *M(After Insertion) b d3 t Threaded Inserts HLTS Coarse HLSS Fine Thread K Threaded Inserts inimum circumferential diameter when d4: M retaining ring fits inside d1 (Clearance inner diameter) *M(After Insertion) Applicable Holes m d0 Small Parts / Magnets RTWN RTWS Stainless Steel Retaining Rings – Internal C-Ring Tongue Threaded Insert (Fig. 3) Threaded Insert (Fig. 4) 1. D rill a pilot hole in the work within the appropriate limit of tap pilot hole diameters shown in the above table. (Hole Depth > Length after Insertion + 2.5 x P Pitch)) 2. Tap with “Taps for Inserts” (Coarse / Medium / Finish Tapping in that order), and completely remove metal chips. 3. Insert Threaded Inserts to tip of sleeve of the Insert Tool (with tang on the tip side), and clip on the tang at the mandrel slot (Fig. 1). Turn the handle and insert Threaded Insert into the guide of thread part on the tool tip. Set it so that the threaded insert does not protrude more than the sleeve tip (leaving 1 or 2 pitches). 4. Turn the handle to install Threaded Inserts by positioning the insert tool perpendicular to the work (Fig. 2). Check the insertion condition from the opening of the sleeve tip. Remove the tool from the work when insertion is complete. *Inserting while pressing the handle hard in the insertion direction causes damages such as skipped threads. Always turn the handle lightly in the horizontal direction. Do not reverse the rotation during the insertion as that will cause damages. 5. After the insertion is complete, insert the tang break-off tool, and break off the tang from the notch by striking the head sharply with a hammer (Fig. 3). 6. When removing Threaded Inserts, press an Insert Removal Tool onto the insert, and slowly turn counterclockwise to remove it (Fig. 4). When reinserting the Threaded Insert into the removed hole, use special tap again before inserting. Check out misumiusa.com for the most current pricing and lead time. 2461
