manual de instrucciones preamplificador pared
Anuncio
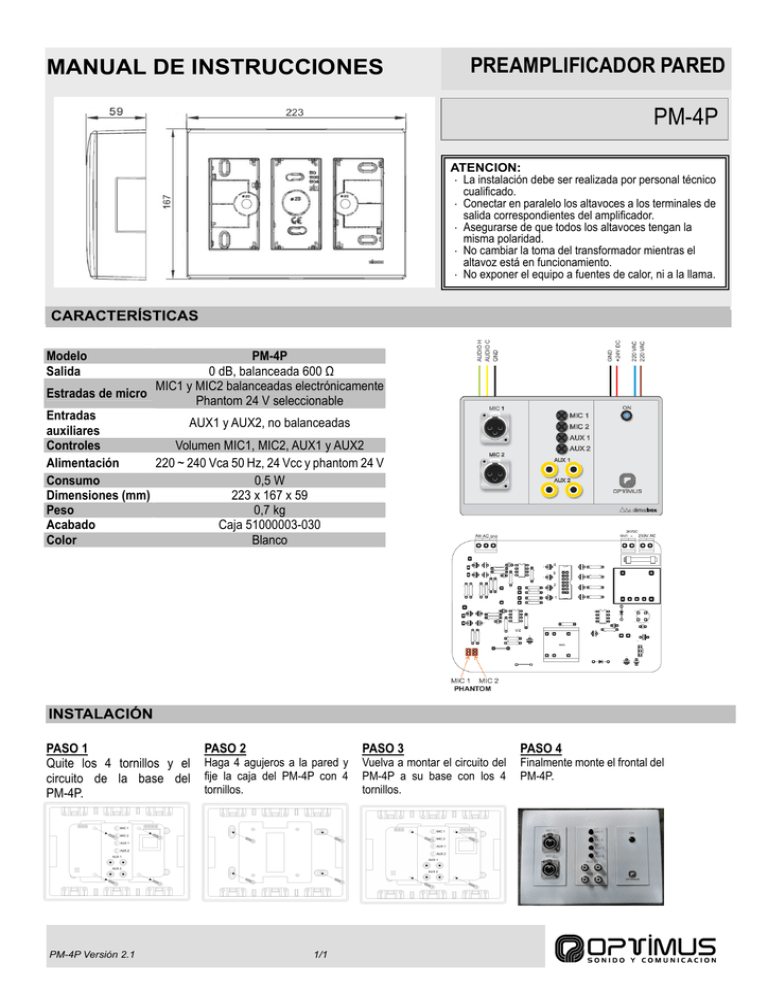
MANUAL DE INSTRUCCIONES PREAMPLIFICADOR PARED PM-4P ATENCIÓN: ⋅ La instalación debe ser realizada por personal técnico cualificado. ⋅ Conectar en paralelo los altavoces a los terminales de salida correspondientes del amplificador. ⋅ Asegurarse de que todos los altavoces tengan la misma polaridad. ⋅ No cambiar la toma del transformador mientras el altavoz está en funcionamiento. ⋅ No exponer el equipo a fuentes de calor, ni a la llama. CARACTERÍSTICAS Modelo Salida PM-4P 0 dB, balanceada 600 Ω MIC1 y MIC2 balanceadas electrónicamente Estradas de micro Phantom 24 V seleccionable Entradas AUX1 y AUX2, no balanceadas auxiliares Controles Volumen MIC1, MIC2, AUX1 y AUX2 Alimentación 220 ~ 240 Vca 50 Hz, 24 Vcc y phantom 24 V Consumo 0,5 W Dimensiones (mm) 223 x 167 x 59 Peso 0,7 kg Acabado Caja 51000003-030 Color Blanco INSTALACIÓN PASO 1 Quite los 4 tornillos y el circuito de la base del PM-4P. PM-4P Versión 2.1 PASO 2 PASO 3 PASO 4 Haga 4 agujeros a la pared y fije la caja del PM-4P con 4 tornillos. Vuelva a montar el circuito del PM-4P a su base con los 4 tornillos. Finalmente monte el frontal del PM-4P. 1/1 WALL PREAMPLIFIER INSTRUCTION MANUAL PM-4P WARNING: ⋅ Installation by qualified personnel only. ⋅ Speakers must be wired in parallel and connected to the correct line terminals of amplifier. ⋅ Ensure that all speakers have the same polarity with respect to each other. ⋅ Do not select another tapings if the speaker is in use. ⋅ No naked flame sources, such as lighted candles, should be placed on the apparatus. SPECIFICATIONS Model Output Micro inputs Aux inputs Controls Power supply Consumption Dimension (mm) Weight Finish Color PM-4P 0 dB, 600 Ω balanced MIC1 & MIC2, electronically balanced Phantom 24 V selectable AUX1 & AUX2, unbalanced Volume controls MIC1, MIC2, AUX1 & AUX2 220 ~ 240 Vac 50 Hz, 24 Vdc & phantom 24V 0,5 W 223 x 167 x 59 0,7 kg 51000003-030 box White INSTALLATION STEP 2 STEP 3 STEP 4 STEP 1 Remove 4 screws and Drill 4 holes into the wall Mount the PM-4P circuit to Finally mount the PM-4P circuit from PM-4P base. and fix the PM-4P box with 4 its base with 4 screws. front panel. screws. PM-4P Version 2.1 1/1


