Instrucciones
Anuncio
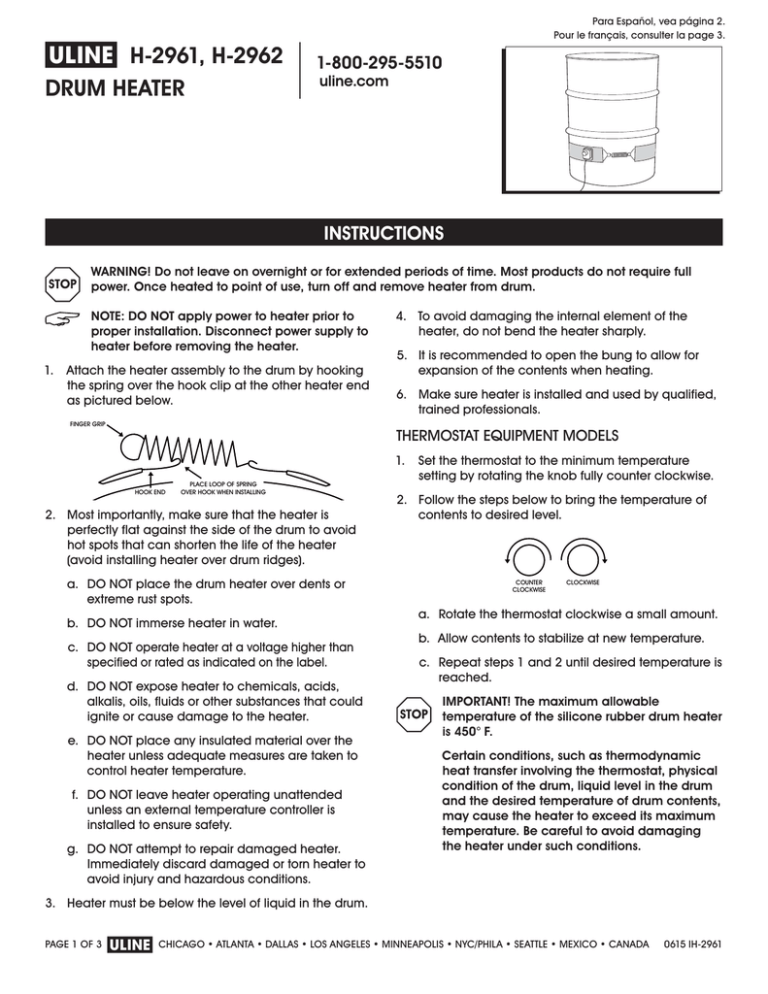
π H-2961, H-2962 DRUM HEATER Para Español, vea página 2. Pour le français, consulter la page 3. 1-800-295-5510 uline.com INSTRUCTIONS WARNING! Do not leave on overnight or for extended periods of time. Most products do not require full power. Once heated to point of use, turn off and remove heater from drum. NOTE: DO NOT apply power to heater prior to proper installation. Disconnect power supply to heater before removing the heater. 1. Attach the heater assembly to the drum by hooking the spring over the hook clip at the other heater end as pictured below. FINGER GRIP 4. To avoid damaging the internal element of the heater, do not bend the heater sharply. 5. It is recommended to open the bung to allow for expansion of the contents when heating. 6. Make sure heater is installed and used by qualified, trained professionals. THERMOSTAT EQUIPMENT MODELS HOOK END PLACE LOOP OF SPRING OVER HOOK WHEN INSTALLING 2. Most importantly, make sure that the heater is perfectly flat against the side of the drum to avoid hot spots that can shorten the life of the heater (avoid installing heater over drum ridges). a. DO NOT place the drum heater over dents or extreme rust spots. b. DO NOT immerse heater in water. c. DO NOT operate heater at a voltage higher than specified or rated as indicated on the label. d. DO NOT expose heater to chemicals, acids, alkalis, oils, fluids or other substances that could ignite or cause damage to the heater. e. DO NOT place any insulated material over the heater unless adequate measures are taken to control heater temperature. f. DO NOT leave heater operating unattended unless an external temperature controller is installed to ensure safety. g. DO NOT attempt to repair damaged heater. Immediately discard damaged or torn heater to avoid injury and hazardous conditions. 1. Set the thermostat to the minimum temperature setting by rotating the knob fully counter clockwise. 2. Follow the steps below to bring the temperature of contents to desired level. COUNTER CLOCKWISE CLOCKWISE a. Rotate the thermostat clockwise a small amount. b. Allow contents to stabilize at new temperature. c. Repeat steps 1 and 2 until desired temperature is reached. IMPORTANT! The maximum allowable temperature of the silicone rubber drum heater is 450° F. Certain conditions, such as thermodynamic heat transfer involving the thermostat, physical condition of the drum, liquid level in the drum and the desired temperature of drum contents, may cause the heater to exceed its maximum temperature. Be careful to avoid damaging the heater under such conditions. 3. Heater must be below the level of liquid in the drum. PAGE 1 OF 3 π CHICAGO • ATLANTA • DALLAS • LOS ANGELES • MINNEAPOLIS • NYC/PHILA • SEATTLE • MEXICO • CANADA 0615 IH-2961 π H-2961, H-2962 CALENTADOR DE TAMBOS 01-800-295-5510 uline.mx INSTRUCCIONES ¡ADVERTENCIA! No dejar encendido durante la noche o durante períodos prolongados. La mayoría de los productos no requieren la capacidad máxima. Una vez calentados al punto de uso, apague y retire el calentador del tambo. NOTA: NO conecte el calentador a la corriente antes de realizar la instalación adecuada. Desconecte el suministro de electricidad al calentador antes de quitar el calentador. 1. Fije el ensamble del calentador al tambo enganchando el resorte por encima del clip de gancho en el otro extremo del calentador tal y como se muestra a continuación. AGARRE DE DEDO 3. El calentador deberá colocarse por debajo del nivel de líquido del tambo. 4. Para evitar dañar la resistencia interna del calentador, no doble el calentador con brusquedad. 5. Recomendamos abrir el tapón para permitir la expansión del contenido mientras se está calentando. 6. Asegúrese de que el calentador sea instalado y usado por profesionales competentes y capacitados. MODELOS DEL EQUIPO DEL TERMOSTATO EXTREMO DE GANCHO COLOCAR EL BUCLE DEL RESORTE SOBRE EL GANCHO AL INSTALAR 2. Lo más importante es que se asegure de que el calentador esté perfectamente plano sobre el lado del tambo para evitar puntos débiles que puedan acortar la vida del calentador (evite colocar el calentador sobre los rebordes del tambo). a. NO coloque el calentador de tambo sobre abolladuras o puntos extremadamente oxidados. b. NO sumerja el calentador en agua. c. NO haga funcionar el calentador a un voltaje superior al especificado o calificado como indicado en la etiqueta. d. NO exponga el calentador a químicos, ácidos, álcalis, aceites, fluidos u otras sustancias que podrían prender o causar daños al calentador. e. NO coloque ningún material aislante encima del calentador a menos que se tomen las medidas adecuadas para controlar la temperatura del calentador. f. NO deje el calentador en funcionamiento sin supervisión a menos que se instale un controlador de temperatura externo para garantizar la seguridad. g. NO intente reparar un calentador dañado. Deseche inmediatamente un calentador estropeado o rasgado para evitar lesiones y condiciones peligrosas. 1. Ponga el termostato a la temperatura mínima girando la perilla completamente en el sentido contrario a las manecillas del reloj. 2. Siga los pasos que se indican a continuación para modificar la temperatura del contenido al nivel deseado. CONTRARIO A LAS MANECILLAS DEL RELOJ SENTIDO DE LAS MANECILLAS DEL RELOJ a. Gire el termostato en el sentido de las manecillas del reloj ligeramente. b. Permita que el contenido se estabilice a la nueva temperatura. c. Repita los pasos 1 y 2 hasta alcanzar la temperatura deseada. ¡IMPORTANTE! La máxima temperatura permisible para el calentador de tambo de goma de silicón son 450 °F. Ciertas condiciones, como la transferencia de calor termodinámica del termostato, la condición física del tambo, el nivel de líquido del tambo y la temperatura deseada del contenido del tambo pueden ocasionar que el calentador sobrepase su temperatura máxima. Tenga cuidado de no dañar el calentador en dichas condiciones. PAGE 2 OF 3 π CHICAGO • ATLANTA • DALLAS • LOS ANGELES • MINNEAPOLIS • NYC/PHILA • SEATTLE • MEXICO • CANADA 0615 IH-2961 π H-2961, H-2962 CHAUFFE-BARIL 1-800-295-5510 uline.ca INSTRUCTIONS AVERTISSEMENT! Ne laissez pas en marche pendant la nuit ou pendant des périodes prolongées. La plupart ARRÊT des produits ne requièrent pas la puissance maximale. Une fois chauffé au point d'utilisation, éteignez et enlevez le chauffe-baril. REMARQUE : N'allumez PAS le chauffe-baril avant de l'installer adéquatement. Débranchez l'alimentation du chauffe-baril avant de retirer le chauffe-baril. 1. Fixez l'ensemble du chauffe-baril au baril en accrochant le ressort sur la pince à crochet à l'autre extrémité du chauffe-baril comme illustré ci-dessous. 3. Le chauffe-baril doit être placé sous le niveau de liquide du baril. 4. Pour éviter d'endommager l'élément interne du chauffe-baril, ne pliez pas trop le chauffe-baril. 5. Il est recommandé d'ouvrir la bonde pour permettre la dilatation du contenu lors du chauffage. 6. Assurez-vous que le chauffe-baril est installé et utilisé par des professionnels formés et qualifiés. BRIDE POUR LE DOIGT MODÈLES MUNIS D'UN THERMOSTAT EXTRÉMITÉ DU CROCHET PLACER L’ANNEAU DU RESSORT SUR LE CROCHET AU MOMENT DE L’INSTALLATION 2. Avant tout, assurez-vous que le chauffe-baril est parfaitement plat contre le côté du baril pour éviter les points chauds qui peuvent réduire la durée de vie du chauffe-baril (évitez d'installer le chauffe-baril sur les bords du baril). 1. Réglez le thermostat à la température minimale en tournant le bouton complètement dans le sens antihoraire. 2. Suivez les étapes ci-dessous pour amener la température du contenu au niveau souhaité. a. NE placez PAS le chauffe-baril sur des bosses ou des taches de rouille considérables. b. N'immergez PAS le chauffe-baril dans l'eau. c. N'utilisez PAS le chauffe-baril à une tension plus élevée que celle prévue ou approuvée, comme indiqué sur l'étiquette. d. N'exposez PAS le chauffe-baril à des produits chimiques, acides, alcalis, huiles, liquides ou autres substances qui pourraient enflammer ou endommager le chauffe-baril. e. NE placez AUCUN matériau isolant sur le chauffebaril à moins que des mesures adéquates soient prises pour contrôler la température du chauffe-baril. f. NE laissez PAS le chauffe-baril sans surveillance lorsqu'il est en marche à moins qu'un contrôleur de température externe ne soit installé pour assurer la sécurité. g. NE tentez PAS de réparer le chauffe-baril lorsqu'il est endommagé. Jetez immédiatement le chauffe-baril s'il est endommagé ou déchiré pour éviter les blessures et des conditions dangereuses. SENS ANTIHORAIRE SENS HORAIRE a. Tournez le thermostat légèrement dans le sens horaire. b. Laissez le contenu se stabiliser à la nouvelle température. c. Répétez les étapes 1 et 2 jusqu'à ce que la température voulue soit atteinte. ARRÊT IMPORTANT! La température maximale admissible du chauffe-baril en caoutchouc de silicone est de 232 °C (450 °F). Certaines conditions, telles que le transfert de chaleur thermodynamique impliquant le thermostat, l'état physique du baril, le niveau de liquide dans le baril et la température souhaitée du contenu du baril, peuvent amener le chauffebaril à dépasser sa température maximale. Soyez prudent pour éviter d'endommager le chauffe-baril dans de telles conditions. PAGE 3 OF 3 π CHICAGO • ATLANTA • DALLAS • LOS ANGELES • MINNEAPOLIS • NYC/PHILA • SEATTLE • MEXICO • CANADA 0615 IH-2961
