Single Sign-On (SSO) - Buford City Schools
Anuncio

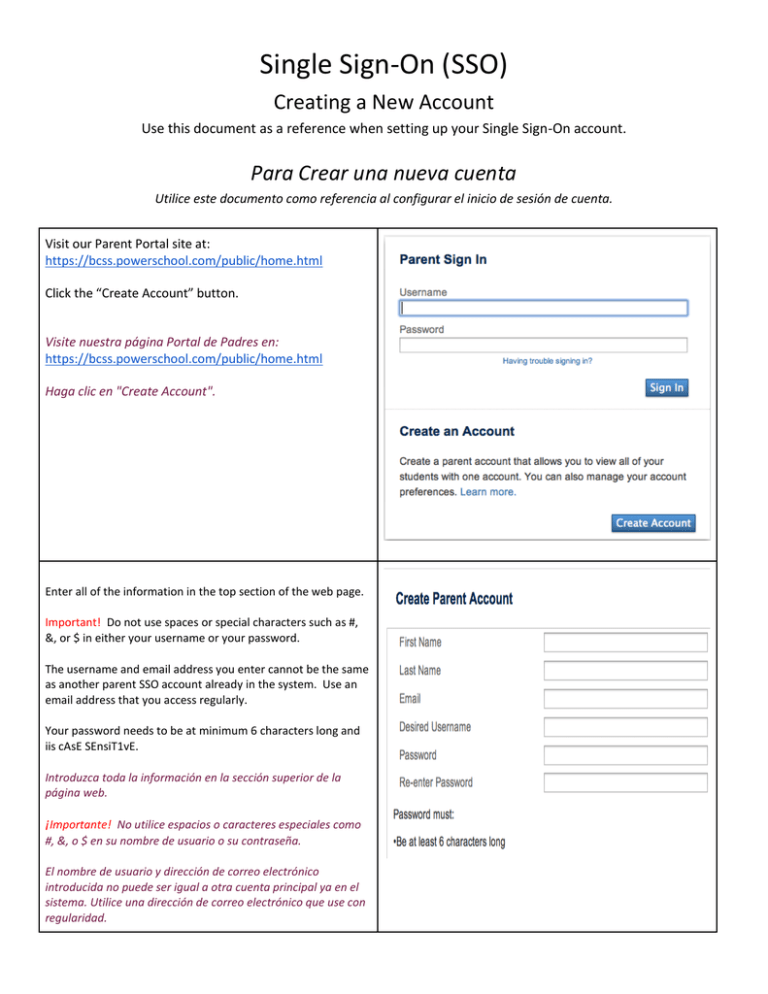
Single Sign-On (SSO) Creating a New Account Use this document as a reference when setting up your Single Sign-On account. Para Crear una nueva cuenta Utilice este documento como referencia al configurar el inicio de sesión de cuenta. Visit our Parent Portal site at: https://bcss.powerschool.com/public/home.html Click the “Create Account” button. Visite nuestra página Portal de Padres en: https://bcss.powerschool.com/public/home.html Haga clic en "Create Account". Enter all of the information in the top section of the web page. Important! Do not use spaces or special characters such as #, &, or $ in either your username or your password. The username and email address you enter cannot be the same as another parent SSO account already in the system. Use an email address that you access regularly. Your password needs to be at minimum 6 characters long and iis cAsE SEnsiT1vE. Introduzca toda la información en la sección superior de la página web. ¡Importante! No utilice espacios o caracteres especiales como #, &, o $ en su nombre de usuario o su contraseña. El nombre de usuario y dirección de correo electrónico introducida no puede ser igual a otra cuenta principal ya en el sistema. Utilice una dirección de correo electrónico que use con regularidad. Single Sign-On (SSO) La contraseña debe ser de un mínimo de 6 caracteres.. Su contraseña es SEnsiT1vA. Enter the names, Access IDs and Access Passwords* for your students. All three are required. These were provided to you by your student’s school. Be sure to use uppercase letters. Select the relationship that most accurately reflects your biological or legal relationship with the student.** Click the ‘Enter’ button when finished. * If you do not have the Access ID and Access Password, contact your child’s school for assistance. For you and your student’s security, the school will need to verify your identity. So you may be asked to make a personal appearance with a Photo ID. ** You can enter up to seven students when initially creating your account. If you need to add additional students at a later date, you can do so by logging into the Parent Portal, clicking on the ‘Account Preferences’ link in the left navigation column, and then clicking on the ‘Students’ tab. Escriba los nombres, identificaciones de acceso y contraseñas de acceso * para sus estudiantes. Los tres son necesarios. Estos fueron proporcionados a usted por la escuela de su estudiante. Asegúrese de utilizar letras mayúsculas. Seleccione la relación que mejor refleja su relación biológica o legal con el estudiante. ** Haga clic en el botón "Enter" cuando haya terminado. * Si usted no tiene la identificación de acceso y contraseña de acceso, póngase en contacto con la escuela de su hijo para obtener asistencia. Para su seguridad y la de su estudiante, la escuela tendrá que verificar su identidad. Así que se le puede pedir hacer una Single Sign-On (SSO) aparición personal con foto de identificación. ** Puede introducir un máximo de siete estudiantes cuando haga inicialmente la creación de su cuenta. Si es necesario agregar estudiantes adicionales en una fecha posterior, puede hacerlo en el inicio de sesión en el Portal para Padres, al hacer clic en el enlace "Account Preferences” en la columna de navegación de la izquierda, y luego hacer clic en la pestaña “Students”. Once you have successfully created your account and log in, you will now see all students you have access to in the upper left corner of the screen. Click on any student’s name to see his/her information. Una vez que haya creado con éxito su cuenta e inicie sesión, vera a todos los estudiantes que tiene acceso en la esquina superior a izquierda de la pantalla. Haga clic en el nombre de cualquier estudiante para ver su información. You can manage your account by clicking the ‘Account Preferences’ icon in the left navigation column. This will allow you to: ● Change your name ● Change your username ● Change your email address ● Change your password ● Add additional students to your account Puede administrar su cuenta haciendo clic en el icono "Account Preferences” en la columna de navegación en la izquierda. Esto le permitirá: ● Cambiar el nombre ● Cambiar el nombre de usuario ● Cambiar su dirección de correo electrónico ● Cambiar su contraseña ● Añadir los estudiantes adicionales a su cuenta


