Installation instructions Draft shield .Magic Cube. for
Anuncio
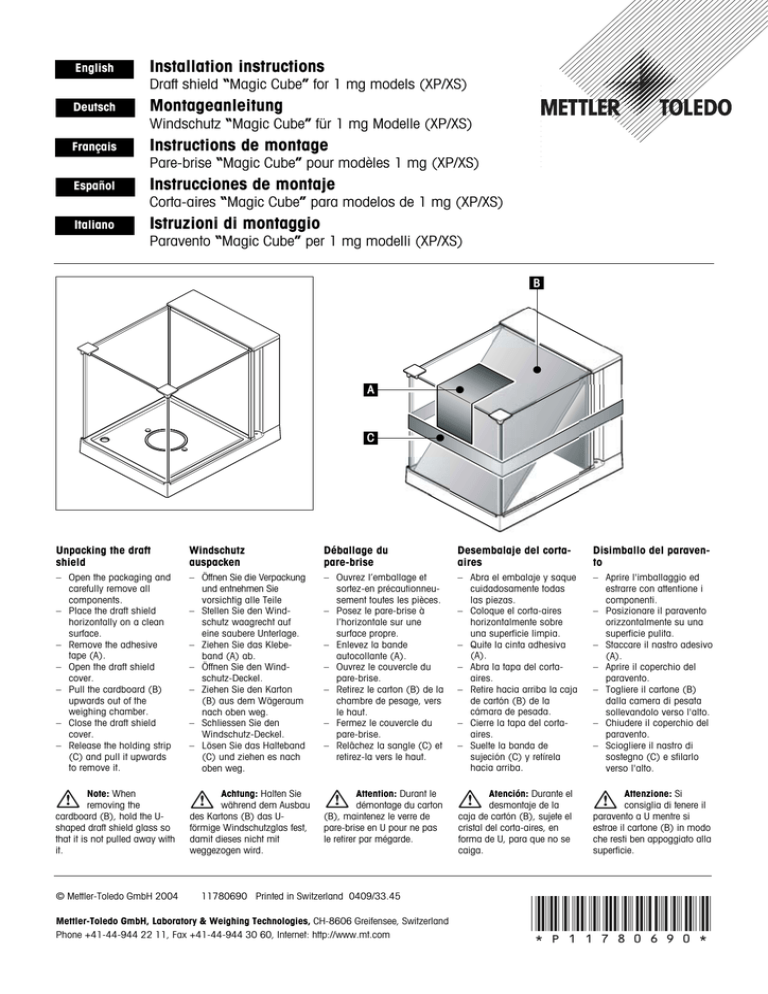
English Installation instructions Draft shield “Magic Cube” for 1 mg models (XP/XS) Deutsch Montageanleitung Windschutz “Magic Cube” für 1 mg Modelle (XP/XS) Français Instructions de montage Pare-brise “Magic Cube” pour modèles 1 mg (XP/XS) Español Instrucciones de montaje Corta-aires “Magic Cube” para modelos de 1 mg (XP/XS) Italiano Istruzioni di montaggio Paravento “Magic Cube” per 1 mg modelli (XP/XS) B A C Unpacking the draft shield Windschutz auspacken Déballage du pare-brise Desembalaje del cortaaires Disimballo del paravento – Open the packaging and carefully remove all components. – Place the draft shield horizontally on a clean surface. – Remove the adhesive tape (A). – Open the draft shield cover. – Pull the cardboard (B) upwards out of the weighing chamber. – Close the draft shield cover. – Release the holding strip (C) and pull it upwards to remove it. – Öffnen Sie die Verpackung und entnehmen Sie vorsichtig alle Teile – Stellen Sie den Windschutz waagrecht auf eine saubere Unterlage. – Ziehen Sie das Klebeband (A) ab. – Öffnen Sie den Windschutz-Deckel. – Ziehen Sie den Karton (B) aus dem Wägeraum nach oben weg. – Schliessen Sie den Windschutz-Deckel. – Lösen Sie das Halteband (C) und ziehen es nach oben weg. – Ouvrez l’emballage et sortez-en précautionneusement toutes les pièces. – Posez le pare-brise à l’horizontale sur une surface propre. – Enlevez la bande autocollante (A). – Ouvrez le couvercle du pare-brise. – Retirez le carton (B) de la chambre de pesage, vers le haut. – Fermez le couvercle du pare-brise. – Relâchez la sangle (C) et retirez-la vers le haut. – Abra el embalaje y saque cuidadosamente todas las piezas. – Coloque el corta-aires horizontalmente sobre una superficie limpia. – Quite la cinta adhesiva (A). – Abra la tapa del cortaaires. – Retire hacia arriba la caja de cartón (B) de la cámara de pesada. – Cierre la tapa del cortaaires. – Suelte la banda de sujeción (C) y retírela hacia arriba. – Aprire l'imballaggio ed estrarre con attentione i componenti. – Posizionare il paravento orizzontalmente su una superficie pulita. – Staccare il nastro adesivo (A). – Aprire il coperchio del paravento. – Togliere il cartone (B) dalla camera di pesata sollevandolo verso l'alto. – Chiudere il coperchio del paravento. – Sciogliere il nastro di sostegno (C) e sfilarlo verso l'alto. Note: When removing the cardboard (B), hold the Ushaped draft shield glass so that it is not pulled away with it. Achtung: Halten Sie während dem Ausbau des Kartons (B) das Uförmige Windschutzglas fest, damit dieses nicht mit weggezogen wird. Attention: Durant le démontage du carton (B), maintenez le verre de pare-brise en U pour ne pas le retirer par mégarde. Atención: Durante el desmontaje de la caja de cartón (B), sujete el cristal del corta-aires, en forma de U, para que no se caiga. Attenzione: Si consiglia di tenere il paravento a U mentre si estrae il cartone (B) in modo che resti ben appoggiato alla superficie. © Mettler-Toledo GmbH 2004 11780690 Printed in Switzerland 0409/33.45 Mettler-Toledo GmbH, Laboratory & Weighing Technologies, CH-8606 Greifensee, Switzerland Phone +41-44-944 22 11, Fax +41-44-944 30 60, Internet: http://www.mt.com *P11780690* 4 3 2 1 F MET TLER TOLE DO F Installing draft shield and weighing pan Montage von Windschutz und Waagschale Montage du pare-brise et du plateau Montaje del corta-aires y del plato de pesada Montaggio del paravento e del piatto Place the following components on the balance in the specified order: Setzen Sie die folgenden Teile in der aufgeführten Reihenfolge auf: Installez les pièces suivantes, dans l’ordre indiqué: Coloque las siguientes piezas en el orden indicado: Installare le seguenti parti nella sequenza presentata: – Place draft shield (1) with closed cover, and then open. – Bottom plate (2) – Pan support (3) – Weighing pan (4) – Windschutz (1), mit geschlossenem Deckel aufsetzen und anschliessend öffnen. – Bodenblech (2) – Schalenträger (3) – Waagschale (4) – Posez le pare-brise (1), avec couvercle fermé, puis ouvrez-le. – Tôle inférieure (2) – Porte-plateau (3) – Plateau (4) – Ponga el corta-aires (1), con la tapa cerrada y, a continuación, ábralo. – Placa de fondo (2) – Soporte del platillo (3) – Plato de pesada (4) – Installare il paravento (1) con il coperchio chiuso. Successivamente aprirlo. – Piastra inferiore (2) – Supporto del piatto (3) – Piatto della bilancia (4) Note: The U-shaped draft shield glass is not permanently connected to the draft shield housing. Always close the cover before picking up the draft shield. Hold the entire draft shield by the housing at the back. Always hold the draft shield with both hands and keep in a horizontal position. Achtung: Das Uförmige Windschutzglas ist nicht fest mit dem Windschutzgehäuse verbunden. Schliessen Sie den Deckel immer bevor Sie den Windschutz in die Hände nehmen. Halten Sie den ganzen Windschutz von hinten am Gehäuse. Halten Sie den Windschutz immer mit beiden Händen und in waagrechter Position. Attention: Le verre de pare-brise en U n’est pas fixé au boîtier du parebrise. Fermez toujours le couvercle avant de saisir le pare-brise. Maintenez l’ensemble du pare-brise sur le boîtier, par derrière. Tenez toujours le pare-brise des deux mains et en position horizontale. Atención: El cristal del corta-aires, en forma de U, no está firmemente unido a la caja del corta-aires. Cierre siempre la tapa antes de coger el corta-aires en la mano. Sujete el corta-aires a la caja desde atrás. Sujete siempre el corta-aires con ambas manos y en posición horizontal. Attenzione: Il paravanto in vetro a forma di U non è collegato in modo fisso all'alloggiamento del paravento. Chiudere sempre il coperchio prima di prendere in mano il paravento. Tenere l'intero paravento da dietro all'alloggiamento. Tenere il paravento sempre con entrambe le mani e in posizione orizzontale. B A F METT LER TOLE DO F Setting options with the draft shield glass Einstellmöglichkeiten mit dem Windschutzglas Possibilités de réglage à l’aide du verre de pare-brise Posibilidades de ajuste con el cristal del cortaaires Possibilità di installazione del paravento in vetro The U-shaped draft shield glass (A) supports different setting options. The draft shield housing contains an additional draft shield pane (B), which can be used as required. Das U-förmige Windschutzglas (A) bietet Ihnen verschiedene Einstellmöglichkeiten. Das Windschutzgehäuse beinhaltet eine zusätzliche Windschutzscheibe (B) die sich je nach Bedarf einsetzen lässt. Le verre de pare-brise en U (A) vous offre plusieurs possibilités de réglage. Le boîtier du pare-brise comporte un écran de parebrise supplémentaire (B) que vous pouvez placer selon les besoins. El cristal del corta-aires, en forma de U, (A) le permite diferentes posibilidades de ajuste. La caja del cortaaires tiene un cristal cortaaires adicional (B), que se puede colocar según las necesidades. Il paravento in vetro a U (A) consente diverse possibilità di installazione. L'alloggiamento del paravento contiene un vetro aggiuntivo (B) che si può inserire secondo necessità. B 2 F F F MET TLER MET TOLE DO TLER MET TLER TOLE DO F F Using the additional draft shield door Einsetzen der zusätzlichen Windschutztüre – Open the draft shield cover. – Pull the draft shield door (B) upwards out of the rear panel. – Insert the draft shield door into the housing from the side (left or right): • First position the draft shield door at the bottom (1) and then swivel it upwards (2) until you feel it snap into place. – Öffnen Sie den Windschutzdeckel. – Ziehen Sie die Windschutztüre (B) aus der Rückwand nach oben. – Setzen Sie die Windschutztüre seitlich (links oder rechts) in das Gehäuse ein: • Positionieren Sie die Windschutztüre zuerst unten (1) und drehen sie anschliessend nach oben (2), bis die Windschutztüre spürbar einrastet. Note: Check that the draft shield door is inserted correctly. The door must close easily. When transporting the balance, hold the draft shield (and the terminal), as this is fitted and not permanently connected to the weighing platform. Achtung: Kontrollieren Sie ob die Windschutztüre richtig eingesetzt ist. Die Türe muss sich leicht schliessen lassen. Halten Sie beim Transport der Waage, den Windschutz (und Terminal), dieser ist aufgesetzt und nicht fest mit der Wägeplattform verbunden. 1 TOLE DO F Installation de la fenêtre de pare-brise supplémentaire Colocación de la puerta del corta-aires adicional Inserimento della porta del paravento aggiuntiva – Ouvrez le couvercle du pare-brise. – Retirez la fenêtre de parebrise (B) de la paroi arrière, par le haut. – Insérez la fenêtre de parebrise latéralement (par la droite ou par la gauche) dans le boîtier: • Positionnez tout d’abord la fenêtre de parebrise par le bas (1), puis faites-la pivoter vers le haut (2), jusqu’à ce que la fenêtre de pare-brise s’encliquète. – Abra la tapa del cortaaires. – Tire hacia arriba de la puerta del corta-aires (B), hasta sacarla de la placa posterior. – Coloque la puerta del corta-aires lateralmente (a la izquierda o a la derecha) en la caja: • Coloque la puerta del corta-aires primero abajo (1) y, a continuación, gírela hacia arriba (2) hasta que note que encaja. – Aprire il coperchio del paravento. – Sfilare la porta del paravento (B) dalla parete di fondo verso l'alto. – Inserire la porta del paravento lateralmente (da sinistra o da destra) nell'alloggiamento: • Posizionare la porta del paravento prima sotto (1) e ruotare successivamente verso l'alto (2), finché la porta non vada a incastrarsi. Attention: Vérifiez que la fenêtre de pare-brise est correctement placée. Elle doit pouvoir être aisément fermée. En transportant la balance, veillez à maintenir le pare-brise (ainsi que le terminal), car celui-ci est simplement posé et non fixé à la plate-forme de pesage. Atención: Compruebe que la puerta del corta-aires está colocada correctamente. La puerta tiene que poder cerrarse suavemente. Durante el transporte de la balanza, debe el corta-aires (y el terminal) ya que éste está colocado pero no unido a la plataforma de pesada. Attenzione: Controllare che la porta del paravento sia inserita correttamente. La porta dovrebbe chiudersi con facilità. Durante il trasporto della bilancia, è necessario sostenere non solo il terminale, ma anche il paravento, che è posizionato e non collegato in modo fisso al ponte di pesata. Cleaning Reinigung Nettoyage Limpieza Pulizia Every now and then, clean the weighing pan, draft shield element, draft shield using a damp cloth. Reinigen Sie die Waagschale, den Windring, den Windschutz hin und wieder mit einem leicht feuchten Lappen. Nettoyez régulièrement le plateau, le pare-brise annulaire et le pare-brise à l’aide d’un chiffon légèrement humide. Limpie de vez en cuando el plato de pesada, la cámara de aire, el corta-aires con un paño ligeramente humedecido. Periodicamente, pulire il piatto, l'anello paravento, il paravento con un panno umido. Ihr Windschutz ist aus hochwertigen, widerstandsfähigen Materialien hergestellt und lässt sich deshalb mit einem handelsüblichen, milden Reinigungsmittel reinigen. Votre pare-brise est composée de matériaux résistants de qualité élevée et peut donc être nettoyée à l'aide d'un produit de nettoyage doux d'usage courant. Su corta-aires está fabricada con materiales resistentes de primera calidad, por ello admite productos de limpieza suaves de uso habitual. – Um das U-förmige Windschutzglas gründlich zu reinigen, nehmen Sie es vorsichtig vom Windschutz ab. – Stellen Sie es wie in der Abbildung dargestellt, auf eine saubere, weiche Unterlage. – Achten Sie beim Wiedereinsetzen auf die korrekte Lage. – Pour nettoyer parfaitement le verre de parebrise, détachez-le précautionneusement du pare-brise. – Posez-le comme indiqué sur le schéma, sur une surface propre et lisse. – Veillez à le remonter correctement. Your draft shield is made from high-quality, durable materials and can therefore be cleaned with a standard, mild cleaning agent. – To thoroughly clean the U-shaped draft shield glass, carefully remove it from the draft shield. – Place it on a clean, soft surface, as illustrated in the diagram. – When reinserting the glass, ensure that it is in the correct position. Please observe the following notes: – On no account use cleaning agents, which contain solvents or abrasive ingredients. – Ensure that no liquid comes into contact with the balance, the terminal or the AC adapter. Beachten Sie bitte die folgenden Hinweise: – Verwenden Sie auf keinen Fall Reinigungsmittel, die Lösungsmittel oder scheuernde Bestandteile enthalten. – Achten Sie darauf, dass keine Flüssigkeit in die Waage, das Terminal oder den Netzadapter gelangt! Observez les remarques suivantes: – N'utilisez en aucun cas des produits de nettoyage contenant des solvants ou des substances abrasives. – Veillez à ce qu'aucun liquide ne pénètre dans la balance, le terminal ou l'adaptateur secteur! – Para limpiar a fondo el cristal del corta-aires, en forma de U, retírelo con cuidado del corta-aires. – Colóquelo sobre una superficie limpia y blanda, como se muestra en la ilustración. – Fíjese en que la posición sea correcta al volver a colocarlo. Tenga presentes las siguientes indicaciones: – No utilice en ningún caso productos de limpieza que contengan disolventes o componentes abrasivos. – Asegúrese de que no entran líquidos en su balanza, el terminal o el adaptador de alimentación. La bilancia è realizzata con materiali resistenti di alta qualità e può quindi essere pulita con uno dei detergenti non aggressivi in commercio. – Per pulire a fondo il vetro a U del paravento, estrarlo con cura dal paravento. – Posizionarlo su un supporto pulito e morbido, come indicato nella figura a fianco. – Nel rimontare questi elementi, fare attenzione a installarli nella loro corretta posizione. Tenere presenti le seguenti avvertenze: – Mai usare detergenti che contengano solventi o particelle abrasive. – Fare attenzione che nella bilancia, nel terminale o nell’alimentatore non penetri liquido.
