Push Connect One-Piece Water Supply Toilet Connector
Anuncio
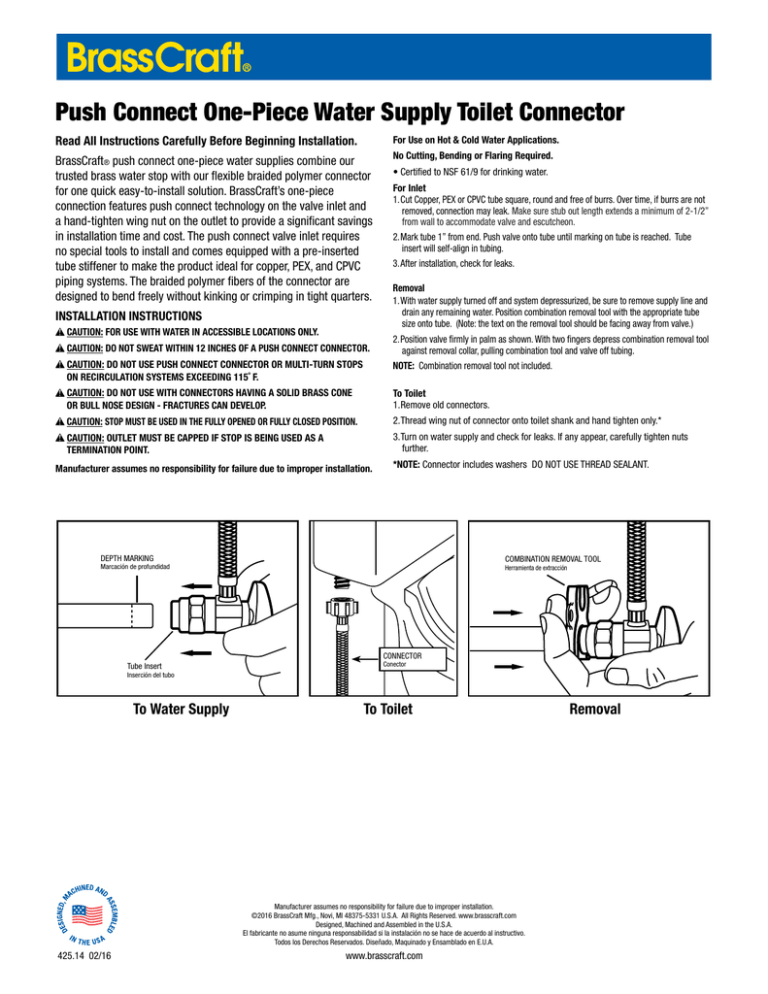
Push Connect One-Piece Water Supply Toilet Connector Read All Instructions Carefully Before Beginning Installation. For Use on Hot & Cold Water Applications. BrassCraft® push connect one-piece water supplies combine our trusted brass water stop with our flexible braided polymer connector for one quick easy-to-install solution. BrassCraft’s one-piece connection features push connect technology on the valve inlet and a hand-tighten wing nut on the outlet to provide a significant savings in installation time and cost. The push connect valve inlet requires no special tools to install and comes equipped with a pre-inserted tube stiffener to make the product ideal for copper, PEX, and CPVC piping systems. The braided polymer fibers of the connector are designed to bend freely without kinking or crimping in tight quarters. No Cutting, Bending or Flaring Required. INSTALLATION INSTRUCTIONS CAUTION: FOR USE WITH WATER IN ACCESSIBLE LOCATIONS ONLY. CAUTION: DO NOT SWEAT WITHIN 12 INCHES OF A PUSH CONNECT CONNECTOR. CAUTION: DO NOT USE PUSH CONNECT CONNECTOR OR MULTI-TURN STOPS ON RECIRCULATION SYSTEMS EXCEEDING 115˚ F. • Certified to NSF 61/9 for drinking water. For Inlet 1.Cut Copper, PEX or CPVC tube square, round and free of burrs. Over time, if burrs are not removed, connection may leak. Make sure stub out length extends a minimum of 2-1/2” from wall to accommodate valve and escutcheon. 2.Mark tube 1” from end. Push valve onto tube until marking on tube is reached. Tube insert will self-align in tubing. 3.After installation, check for leaks. Removal 1.With water supply turned off and system depressurized, be sure to remove supply line and drain any remaining water. Position combination removal tool with the appropriate tube size onto tube. (Note: the text on the removal tool should be facing away from valve.) 2.Position valve firmly in palm as shown. With two fingers depress combination removal tool against removal collar, pulling combination tool and valve off tubing. NOTE: Combination removal tool not included. CAUTION: DO NOT USE WITH CONNECTORS HAVING A SOLID BRASS CONE OR BULL NOSE DESIGN - FRACTURES CAN DEVELOP. To Toilet 1.Remove old connectors. CAUTION: STOP MUST BE USED IN THE FULLY OPENED OR FULLY CLOSED POSITION. 2.Thread wing nut of connector onto toilet shank and hand tighten only.* CAUTION: OUTLET MUST BE CAPPED IF STOP IS BEING USED AS A TERMINATION POINT. 3.Turn on water supply and check for leaks. If any appear, carefully tighten nuts further. Manufacturer assumes no responsibility for failure due to improper installation. *NOTE: Connector includes washers DO NOT USE THREAD SEALANT. DEPTH MARKING COMBINATION REMOVAL TOOL Marcación de profundidad Herramienta de extracción CONNECTOR Tube Insert Conector Inserción del tubo To Water Supply To Toilet Manufacturer assumes no responsibility for failure due to improper installation. ©2016 BrassCraft Mfg., Novi, MI 48375-5331 U.S.A. All Rights Reserved. www.brasscraft.com Designed, Machined and Assembled in the U.S.A. El fabricante no asume ninguna responsabilidad si la instalación no se hace de acuerdo al instructivo. Todos los Derechos Reservados. Diseñado, Maquinado y Ensamblado en E.U.A. 425.14 02/16 www.brasscraft.com Removal Valvula Para Conexión Rapida Para W.C. Lea todas las instrucciones atentamente antes de comenzar la instalación El fabricante no asume responsabilidad por fallas ocasionadas por una instalación inadecuada. La conexión rapida suministro de agua de una sola pieza de BrassCraft ® combina su válvula de latón de confianza con su conector de polímero trenzado flexible, para una rápida solución fácil de instalar. De una sola pieza funciones de conexión de BrassCraft® empujan conectar la tenología en la entrada de la válvula y una tuerca de mariposa a apretar la mano en la toma de corriente para proporcionar un ahorro significativo en el tiempo de instalación y costo. Entrada de la válvula para conexión rapida no requier herramientas especiales para instalar y viene equipada con un refuerzo previamente insertado el tubo para hacer el producto ideal para sistemas de tuberías de cobre, PEX, y CPVC. Las fibras de polímero trenzado del conector están diseñados para doblarse libremente sin retorcimiento o prensar en espacios reducidos. No se necesita cortar, doblar ó avellanar. INSTRUCCIONES DE INSTALACIONES PRECAUCIÓN: PARA USAR CON AGUA EN UBICACIONES ACCESIBLES SOLAMENTE. 2. Coloque la válvula firmemente en sus manos como se muestra. Con dos de dos presione la herramienta de extracción contra el collar de extracción, tirando de la herramienta y de la válvula para sacarla del tubo. Al W.C. 1. Retire los conectores de suministro usados. PRECAUCIÓN: NO USAR LLAVES PUSH CONNECT O MULTIVUELTA EN SISTEMAS DE RECIRCULACIÓN QUE EXCEDAN 115 GRADOS F. PRECAUCIÓN: NO USAR CON CONECTORES QUE TENGAN UN CONO DE LATÓN SÓLIDO O UN DISEÑO DE TAPÓN DE CABEZA REDONDA - PUEDEN PRODUCIRSE FRACTURAS. PRECAUCIÓN: LA SALIDA DEBE ESTAR TAPADA SI LA LLAVE SE USA COMO PUNTO DE TERMINACIÓN. Extracción 1. Sin alimentación de agua y con el sistema despresurizado, asegúrese de remover el conector y drenar todo el agua restante. Coloque la herramienta de extracción con el tamaño de tubo adecuado sobre el tubo. (Nota: el texto en la herramienta de extracción no debe estar apuntando a la válvula). NOTA: La herramienta de extracción no está incluida. PRECAUCIÓN: NO SOLDAR A MENOS DE 12 PULGADAS DE UNA VÁLVULA PUSH CONNECT CONNECTOR DE 1/4 DE VUELTA. PRECAUCIÓN: LA LLAVE DEBE USARSE EN LA POSICIÓN TOTALMENTE ABIERTA O TOTALMENTE CERRADA. •Certificado según la norma NSF 61/9 para agua potable. Para Entrada 1. Verifique que el caño sobresalga de la pared 2-1/2” (6,35cm) como mínimo para poder colocar la válvula y el chapetón. 2. Haga una marca en el tubo a 1” (2,54cm) desde el extremo. Empuje la válvula sobre el tubo hasta alcanzar la marca en el tubo. El inserto del tubo quedará automcamente alineado con el tubo. 3. Verifique que no haya ninguna pérdida después de la instalación. 2. Enrosque la tuerca de mariposa del conector a la tuerca de plástico del w.c., apriete con la mano.* 5. Abra el suministro de agua y revise si no hay fugas. Si huberia, apriete las tuercas un poco más. *NOTA: El conector incluye rondanas, NO UTILICE SELLADOR DE ROSCA. DEPTH MARKING COMBINATION REMOVAL TOOL Marcación de profundidad Herramienta de extracción CONNECTOR Tube Insert Conector Inserción del tubo Al Suministro de Agua Al W.C. Manufacturer assumes no responsibility for failure due to improper installation. ©2016 BrassCraft Mfg., Novi, MI 48375-5331 U.S.A. All Rights Reserved. www.brasscraft.com Designed, Machined and Assembled in the U.S.A. El fabricante no asume ninguna responsabilidad si la instalación no se hace de acuerdo al instructivo. Todos los Derechos Reservados. Diseñado, Maquinado y Ensamblado en E.U.A. 425.14 02/16 www.brasscraft.com Extracción
