π H-1217 - Uline.mx
Anuncio
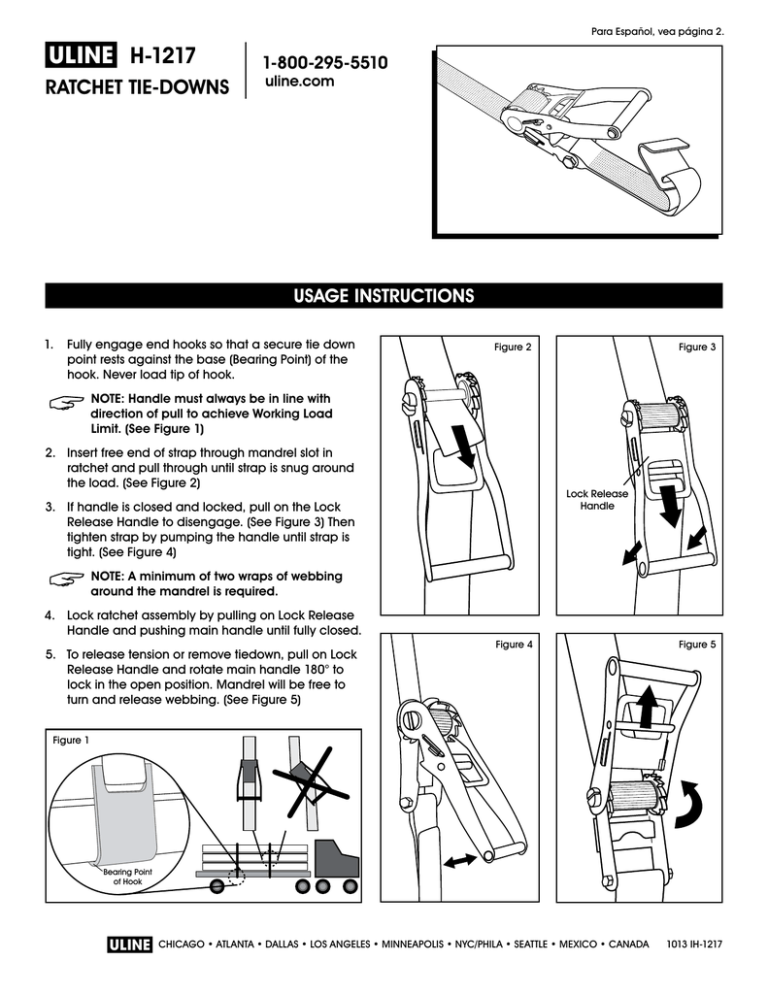
Para Español, vea página 2. π H-1217 RATCHET TIE-DOWNS 1-800-295-5510 uline.com USAGE INSTRUCTIONS 1. Fully engage end hooks so that a secure tie down point rests against the base (Bearing Point) of the hook. Never load tip of hook. Figure 2 Figure 3 NOTE: Handle must always be in line with direction of pull to achieve Working Load Limit. (See Figure 1) 2. Insert free end of strap through mandrel slot in ratchet and pull through until strap is snug around the load. (See Figure 2) Lock Release Handle 3. If handle is closed and locked, pull on the Lock Release Handle to disengage. (See Figure 3) Then tighten strap by pumping the handle until strap is tight. (See Figure 4) NOTE: A minimum of two wraps of webbing around the mandrel is required. 4. Lock ratchet assembly by pulling on Lock Release Handle and pushing main handle until fully closed. 5. To release tension or remove tiedown, pull on Lock Release Handle and rotate main handle 180° to lock in the open position. Mandrel will be free to turn and release webbing. (See Figure 5) Figure 4 Figure 5 Figure 1 Bearing Point of Hook π CHICAGO • ATLANTA • DALLAS • LOS ANGELES • MINNEAPOLIS • NYC/PHILA • SEATTLE • MEXICO • CANADA 1013 IH-1217 π H-1217 CORREAS CON TRINQUETE PARA CARGA 01-800-295-5510 uline.mx INSTRUCCIONES DE USO 1. Enganche completamente los extremos para que la correa quede apoyada contra la base (Punto de Suspensión) del gancho. Nunca cargue la punta del gancho. Diagrama 2 Diagrama 3 NOTA: La palanca siempre debe estar en línea con la dirección en la que va a jalar la correa para llegar al Límite de Carga de Trabajo. (Vea Diagrama 1) 2. Inserte el extremo suelto de la correa por la ranura del mandril en el trinquete y jale hasta que la correa quede bien ajustada a la carga. (Vea Diagrama 2) Palanca de Liberación 3. Si la palanca está cerrada y asegurada, jale la Palanca de Liberación para abrirla. (Vea Diagrama 3) Luego ajuste la correa bombeando la palanca hasta que la correa quede tirante. (Vea Diagrama 4) NOTA: Se requieren mínimo dos vueltas de la correa por el mandril. 4. Cierre el ensamble del trinquete jalando la Palanca de Liberación y empujando la palanca principal hasta que quede completamente cerrado. 5. Para liberar tensión o quitar la correa, jale la Palanca de Liberación y gire la palanca principal 180° para quedar en la posición abierta. El mandril quedará libre para girar y remover la correa. (Vea Diagrama 5) Diagrama 4 Diagrama 5 DIagrama 1 Punto de Suspensión del Gancho π CHICAGO • ATLANTA • DALLAS • LOS ANGELES • MINNEAPOLIS • NYC/PHILA • SEATTLE • MEXICO • CANADA 1013 IH-1217
