1 2 Quick Setup Guide/Guía de ajuste rápido DAV-DZ730
Anuncio

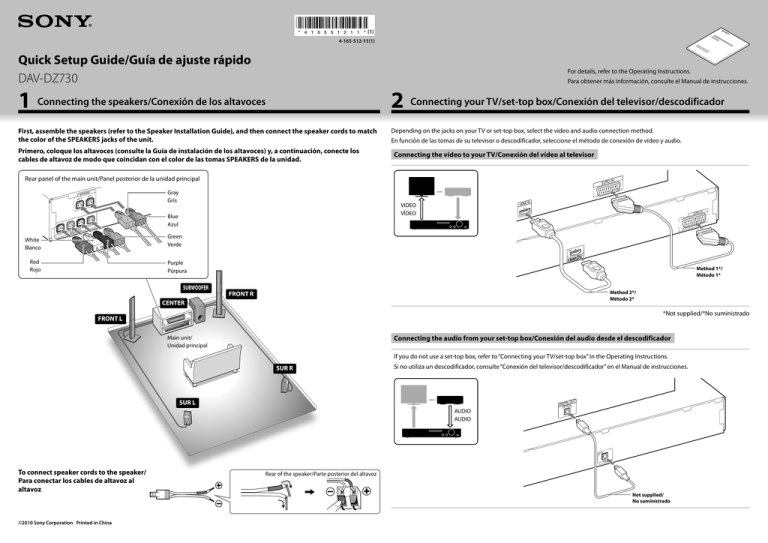
(1) 4-165-512-11(1) Quick Setup Guide/Guía de ajuste rápido DAV-DZ730 For details, refer to the Operating Instructions. Para obtener más información, consulte el Manual de instrucciones. 1 Connecting the speakers/Conexión de los altavoces 2 Connecting your TV/set-top box/Conexión del televisor/descodificador First, assemble the speakers (refer to the Speaker Installation Guide), and then connect the speaker cords to match the color of the SPEAKERS jacks of the unit. Depending on the jacks on your TV or set-top box, select the video and audio connection method. Primero, coloque los altavoces (consulte la Guía de instalación de los altavoces) y, a continuación, conecte los cables de altavoz de modo que coincidan con el color de las tomas SPEAKERS de la unidad. En función de las tomas de su televisor o descodificador, seleccione el método de conexión de vídeo y audio. Connecting the video to your TV/Conexión del vídeo al televisor VIDEO EO TV/VID Rear panel of the main unit/Panel posterior de la unidad principal TV DI TL DIO OU R AU KERS SPEA R SUR SUR Gray Gris L HDMI FRONT OPTIC BW L SU KERS SPEA HDMI VIDEO VÍDEO OUT Blue Azul ER CENT OOFER R FRONT AL O IN T VIDE ONEN COMP IAL COAX Y IN NNA ANTE PR/CR PB/CB AL COXIFM 75 O AV EUR T10 EZW-R Green Verde White Blanco IN AV EURO T OU GITAL LE TV/CAB L IN DIGITA Y IAL PR/CR VIDEO OUT VIDEO OUT OU TP IN L UT (T O TV ) /CABLE TV CO COAX L ARC PB/CB ENT MPON DIO R AU OPTICA OUT Red Rojo Purple Púrpura SUBWOOFER Method 1*/ Método 1* Method 2*/ Método 2* FRONT R CENTER *Not supplied/*No suministrado FRONT L Connecting the audio from your set-top box/Conexión del audio desde el descodificador Main unit/ Unidad principal If you do not use a set-top box, refer to “Connecting your TV/set-top box” in the Operating Instructions. SUR R Si no utiliza un descodificador, consulte “Conexión del televisor/descodificador” en el Manual de instrucciones. AUDIO EO TV/VID TV AL OPTIC AUDIO AUDIO TL R CO DIO OU R AU SUR L L OUT DIGITAAXIAL T L OU DIGITA UT OUTP L L OUT DIGITTAICAL IAL COAX NNA ANTE OP AL COXIFM T10 EZW-R PR/CR UT DEO O VIDEO OUT DIO R AU COM AL OPTIC TV To connect speaker cords to the speaker/ Para conectar los cables de altavoz al altavoz ©2010 Sony Corporation Printed in China Rear of the speaker/Parte posterior del altavoz HDMI IN L LE TV/CAB T VI PONEN Y L DIGITA IN PB/CB OUT Not supplied/ No suministrado 75 Listening to TV sound from all speakers/ Audición del sonido del televisor a través de todos los altavoces 3 Performing the Quick Setup/Realización del ajuste rápido Note Note Do not insert a disc before performing the Quick Setup. Displayed items vary depending on the area. Select the speaker formation. Nota Nota No inserte ningún disco antes de realizar el ajuste rápido. Los elementos que aparecen varían en función de la zona. 1 Connect the AC power cord. 1 Press TV. SPEAKER FORMATION Pulse TV. Seleccione la disposición de los altavoces. STANDARD The shape of the wall outlet differs depending on the area. Home Theatre System Conecte el cable de alimentación de ca. /, La forma de la toma de pared varía en función de la zona. TR FRON TL FRON OFER SUBWO ER CENT KERS SPEA 2 Turn on the power of the main unit and TV. Encienda la unidad principal y el televisor. 2 Press SYSTEM MENU. Connect the calibration mic and set it at the listening position. Select an on-screen language. Seleccione un idioma para las indicaciones en pantalla. LANGUAGE SETUP OSD: MENU: AUDIO: SUBTITLE: ENGLISH ENGLISH FRANÇAIS DEUTSCH ITALIANO ESPAÑOL NEDERLANDS DANSK Pulse SYSTEM MENU. Conecte el micrófono de calibración y ajústelo en la posición de escucha. A.CAL MIC AUDIO IN / to display “SUR.SETTING,” then press 3 Press . Pulse / hasta que aparezca “SUR.SETTING” y, a continuación, pulse . /, / Select the aspect ratio of the connected TV. / (power/encendido) the input selector on your TV to display 3 Switch “SONY Home Theatre System.” Cambie el ajuste del selector de entrada del televisor para visualizar “SONY Home Theatre System”. 4 Set. each following item, using /// and Ajuste cada uno de los elementos siguientes mediante /// y . ///, (ENTER) Seleccione el formato del televisor conectado. VIDEO SETUP TV TYPE: LINE: PAUSE MODE: 16:9 16:9 4:3 LETTER BOX 4:3 PAN SCAN / to display “PRO LOGIC,” then press 4 Press . /, Select the output method for video signals. VIDEO SETUP TV TYPE: LINE: PAUSE MODE: 16:9 VIDEO VIDEO RGB VIDEO Seleccione el método de salida de las señales de vídeo. Select [YES] to perform [AUTO CALIBRATION]. Seleccione [SI] para ejecutar la función [CALIBRAC. AUTOM.]. Seleccione [SI] si conecta la unidad principal y el televisor con un cable HDMI. HDMI SETUP AUTO(1920x1080p) HDMI RESOLUTION: OFF CONTROL FOR HDMI: VOLUME LIMIT: OFF ON AUDIO RETURN CHANNEL: YCBCR/RGB(HDMI): YCBCR AUDIO(HDMI): OFF JPEG RESOLUTION: SD /, AUTO CALIBRATION Connect calibration mic. Start measurement? YES NO /, /, Select [ON] when you connect the main unit and the TV with an HDMI cable. Pulse / hasta que aparezca “PRO LOGIC” y, a continuación, pulse . Select [YES] to save the measurement results. Seleccione [SI] para guardar los resultados de la medición. Measurement complete. FRONT L : YES FRONT R : YES CENTER : YES SUBWOOFER : YES SURROUND L : YES SURROUND R : YES If OK, unplug calibration mic and select “YES”. YES NO /, QUICK SETUP is complete. Home Theatre System 5 Press SYSTEM MENU to exit the menu. Pulse SYSTEM MENU para salir del menú.


