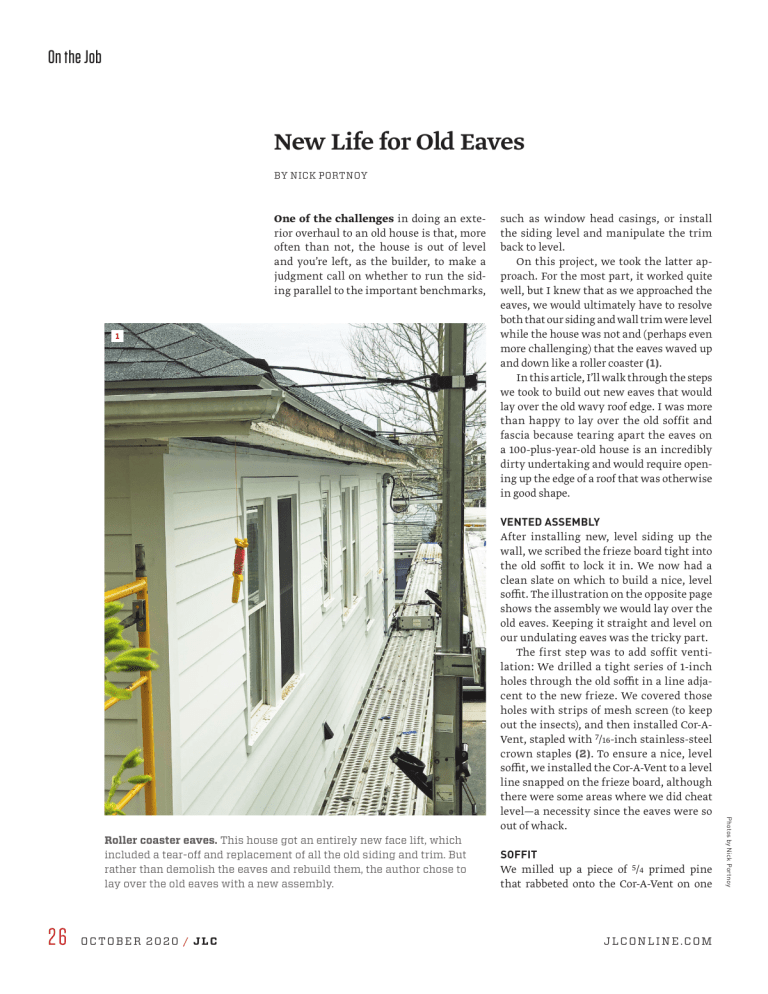
On the Job New Life for Old Eaves BY NICK PORTNOY One of the challenges in doing an exterior overhaul to an old house is that, more often than not, the house is out of level and you’re left, as the builder, to make a judgment call on whether to run the siding parallel to the important benchmarks, 1 such as window head casings, or install the siding level and manipulate the trim back to level. On this project, we took the latter approach. For the most part, it worked quite well, but I knew that as we approached the eaves, we would ultimately have to resolve both that our siding and wall trim were level while the house was not and (perhaps even more challenging) that the eaves waved up and down like a roller coaster (1). In this article, I’ll walk through the steps we took to build out new eaves that would lay over the old wavy roof edge. I was more than happy to lay over the old soffit and fascia because tearing apart the eaves on a 100-plus-year-old house is an incredibly dirty undertaking and would require opening up the edge of a roof that was otherwise in good shape. VENTED ASSEMBLY 26 OCTOBER 2020 / JLC SOFFIT We milled up a piece of 5/4 primed pine that rabbeted onto the Cor-A-Vent on one J LCON LIN E.COM Photos by Nick Portnoy Roller coaster eaves. This house got an entirely new face lift, which included a tear-off and replacement of all the old siding and trim. But rather than demolish the eaves and rebuild them, the author chose to lay over the old eaves with a new assembly. After installing new, level siding up the wall, we scribed the frieze board tight into the old soffit to lock it in. We now had a clean slate on which to build a nice, level soffit. The illustration on the opposite page shows the assembly we would lay over the old eaves. Keeping it straight and level on our undulating eaves was the tricky part. The first step was to add soffit ventilation: We drilled a tight series of 1-inch holes through the old soffit in a line adjacent to the new frieze. We covered those holes with strips of mesh screen (to keep out the insects), and then installed Cor-AVent, stapled with 7/16-inch stainless-steel crown staples (2). To ensure a nice, level soffit, we installed the Cor-A-Vent to a level line snapped on the frieze board, although there were some areas where we did cheat level—a necessity since the eaves were so out of whack. side and had a corresponding groove for the soffit on the other (3). The soffit was wider than a 1x12, and I didn’t want to use sheet stock. Instead, we used a pre­ primed tongue-and-groove shiplap board. It’s sold in two sizes—1x6 and 1x8. Since the depth of our soffit was around 18 inches, we used the 1x8 in the middle with ripped 1x6 product on each side. We milled a tongue in the first board that allowed it to slip into the groove of the board (which I will call a frieze mold, for lack of a better term) that covered the Cor-A-Vent. Soffit support. Because the old eaves were all over the place, there were sections where we cut and installed tapered strips of framing stock to act as a substrate for the new soffit (4). There were also sections where we had to remove portions of the soffit (reluctantly) and sister framing to create the new soffit plane (5). Adjustments. Also, because the house wasn’t exactly straight, we ran a dry line that was parallel with the outside edge of the fascia and set the first T&G soffit board parallel with that. Having the tongue-and-groove connection between the soffit and frieze mold provided some room for adjustment on this. This proved particularly helpful at corners where the boards need to visually align (6). 2 3 FASCIA With the soffit installed, we were faced with the question of what to do with the fascia. I didn’t want to demo the fascia in its entirety. There was a relatively new roof installed on this house, and I was concerned there would be nails, which we didn’t want to disturb, from the drip edge down into the fascia. Also, because of the irregularity of the old eaves, I didn’t want to have to scribe a new fascia board up underneath an existing drip edge. That would have been time-consuming and, frankly, I’m not that patient. J LCON LIN E.COM The author’s sketch of the assembly he used to lay over the old eaves (top). He started with a line of 1-inch vent holes drilled through the existing soffit, over which he installed bug screen and Cor-A-Vent (2). He then milled a “frieze mold” from 5/4 stock with a rabbet to lap over the Cor-A-Vent and a groove to accept the soffit (3). JLC / OCTOBER 2020 27 On the Job / New Life for Old Eaves 4 5 6 7 8 9 To accommodate the out-of-level eaves, new soffit was supported with tapered blocks in some areas (4), but in others, the old soffit was torn out and a new soffit plane was created with sistered framing (5). Three soffit boards allowed for some adjustment in width, but the boards had to align at corners (6). Part of the old fascia was left in place, ripped level, and joined to new fascia (7, 8). The joint between old and new is flashed with coil stock (9). 28 OCTOBER 2020 / JLC J LCON LIN E.COM 10 With nail holes filled and the new assembly painted out, the crisp lines of the new assembly come to light (10, 11). When completed with new gutter all around, the 100-plus-year-old home looks as straight and new as the day it was built. You would have no clue that old, multilayered, out-of-whack eaves were behind the new work (12). 11 12 We decided to leave the top portion of the old fascia in place and ripped the bottom 3 inches off, snapping a cut line parallel with our new soffit. We then milled a rabbeted piece of 5/4x4 stock that lapped our new soffit and sat flush with the existing fascia (7, 8). To cover the joint between the old and the new fascia, we slid some aluminum coil stock underneath the roof drip edge (9, 10). We secured this with 7/16-inch staples at the location of the rafter tails. This flashing would eventually be covered by the gutter. I told the gutter contractor to look for the staples in the aluminum flashing to know where the framing would be for his gutter hangers. Finally, because we have all seen aluminum get torn off eaves in heavy winds, we milled a 5/16-inch piece of Azek (from 1-by stock ripped on edge) and slid it underneath the drip edge, lapping on top of the aluminum. This provided the dual benefit of a drip board and a more robust connection of the aluminum flashing. Once everything was painted (10, 11) and the gutter was installed (12), you would have no clue that there was a multilayered assembly behind it. Nick Portnoy owns Nick Portnoy Builders based in Watertown, Mass. J LCON LIN E.COM JLC / OCTOBER 2020 29


