WARNING: Unplug unit when attaching or removing nozzle adapter
Anuncio
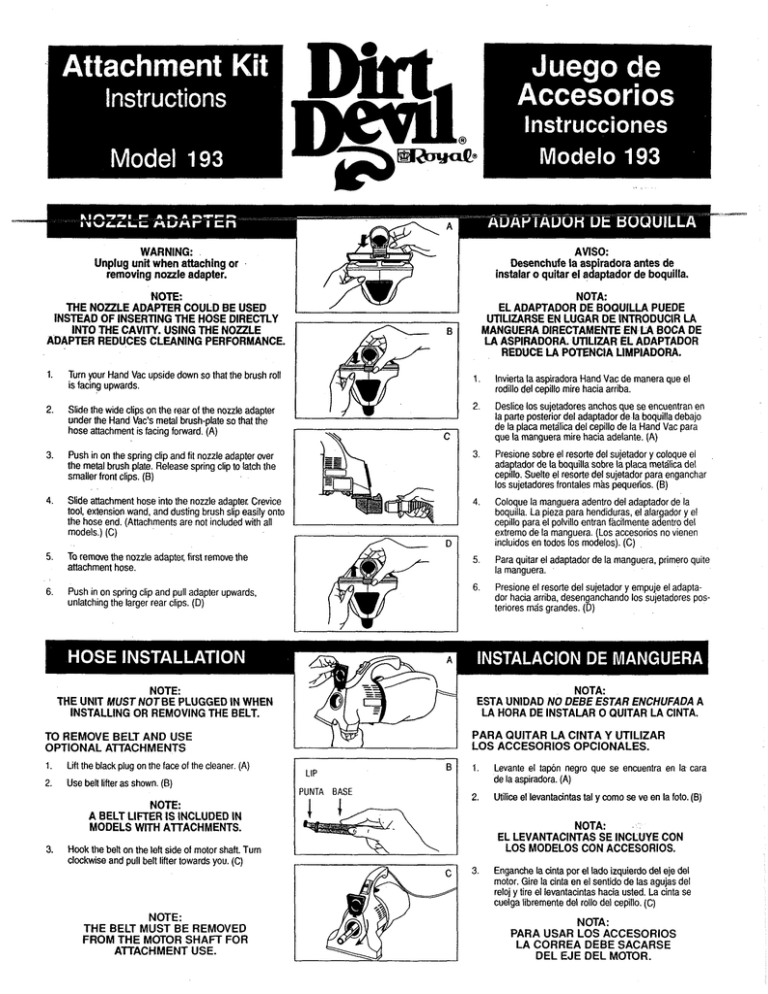
WARNING: Unplug unit when attaching or removing nozzle adapter. AVISO: Desenchufe la aspiradora antes de instalar o quitar el adaptador de boquilla. NOTE: THE NOZUE ADAPTER COULD BE USED INSTEAD OF INSERTING THE HOSE DIRECTLY INTO THE CAVITY. USING M E NOZZLE ADAPTER REDUCES CLEANING PERFORMANCE. NOTA: EL ADAPTADOR DE BOCIUILLA PUEDE UTILIZARSE EN LUGAR DE INTRODUCIR LA MANGUERA DIRECTAMENTE EN LA BOCA DE LA ASPIRADORA. UTILlZAR EL ADAPTADOR REDUCE LA POTENCIA LIMPIADORA. Turn your Hand Vac upside down so that the brush roll is facing upwards. 1. lnvierta la aspiradora Hand Vac de manera que el rodillo del cepillo mire hacia arriba. Slide the wide clips on the rear of the nozzle adapter under the Hand Vac's metal brush-plateso that the hose attachment is facing forward. (A) 2 Deslice 10s sujetadores anchos que se encuentran en la parte posterior del adaptador de la boquilla debajo de la placa metalica del cepillo de la Hand Vac para que la manguera mire hacia adelante. (A) 3. Presione sobre el resorte del sujetador y coloque el adaptador de la boquilla sobre la placa metalica del cepillo. Suelte el resorte del sujetador para enganchar 10s sujetadores frontales mas pequeiios. (0) 4. Coloque la manguera adentro del adaptador de la boquilla. La pieza para hendiduras, el alargador y el cepillo para el polvillo entran facilmente adentro del extremo de la rnanguera. (Los accesorios no vienen incluidos en todos 10s modelos). (C) 5. Para quitar el adaptador de la rnanguera, prirnero quite la manguera. 6. Presione el resorte del sujetador y empuje el adaptador hacia arriba, desenganchando 10s sujetadores posterlores mas grandes. (D) Push in on the spring clip and fit nozzle adapter over the metal brush plate. Release spring clip to latch the smaller front clips. (8) Slide attachment hose into the nozzle adapter. Crevice tool, extension wand. and dusting brush slip easily onto the hose end. (Attachments are not included with all models.) (C) To remove the nozzle adapter, first remove the attachment hose. I C 1 Push in on spring clip and pull adapter upwards, unlatching the larger rear clips. (0) NOTE: THE UNIT MUST NOTBE PLUGGED IN WHEN INSTALLING OR REMOVING THE BELT. TO REMOVE BELT AND USE OPTIONAL ATTACHMENTS 1. Lift the black plug on the face of the cleaner. (A) 2. Use belt lifter as shown. (B) NOTE: A BELT LIFTER IS INCLUDED IN MODELS WITH ATTACHMENTS. 3. NOTA: ESTA UNIDAD NO DEBE ESTAR ENCHUFADA A LA HORA DE INSTALAR 0 QUITAR LA CINTA. I I LIP PUNTA BASE B I PARA QUITAR LA CINTA Y UTlLlZAR LOS ACCESORIOS OPCIONALES. I Levante el ta@n negro que se encuentra en la cara de la aspiradora. (A) 2. Utilice el levantauntas tal y como se ve en la foto. (0) NOTA: EL LEVANTACINTAS SE INCLUYE CON LOS MODELOS CON ACCESORIOS. Hook the belt on the left side of motor shaft. Turn clockwise and pull belt lifter towards you. (C) 3. NOTE: THE BELT MUST BE REMOVED FROM THE MOTOR SHAFT FOR ATTACHMENT USE. Enganche la cinta por el lado izquierdo del eje del motor. Gire la cinta en el sentido de las agujas del reloj y tire el levantacintas hacia usted. La cinta se cuelga libremente del rollo del cepillo. (C) NOTA: PARA USAR LOS ACCESORIOS LA CORREA DEBE SACARSE DEL EJE DEL MOTOR. 4. €&press spring on hose (as shown). Insert hose into 4. cavity. (Dl NOTE: -SPRING CLIP MUST LINE UP WITH GROOVE AT BOITOM OF THE CAVITY OPENING. I 6. NOTA: EL MUELLE DEBE AUNEARSE CON LA RANURA EN LA PARE INFERIOR DE LA BOCA DE LA ABERTURA. E] Hose attachment is in place and ready for use. Crevice tool, extension wand and dusting brush slip easily onto hose end. (E) Presione el muelle de la manguera (vea dibujo). lntroduzca la manguera en la abertura.(D) 6. When you finish using attachments, remove them and return belt to shaft. . La manguera est6 colocada y preparada para utilizarse. El accesorio para espacios pequeiios, el tubo alargador y el cepillo quitapolvosse colocan con facilidad sobre la boca de la manguera. (E) Despues de utilizar 10s accesorios, quitelos y welva a wlocar la cinta sobre el eje. 1 PUNTA I BASE 1. Remove hose. 2. Use belt lifter and hold as shown. (A) Utilice el levantacintas, cogi6ndolo tal y como se ve en la foto. (A) 3. Center and raise belt with your left hand as shown, using your right hand, dip belt liier in and hook belt around lip of belt lifter. Slip belt onto motor shaft until belt lifter base meets the shaft. (0) Centre y levante la cinta con la mano izquierda tat y corno se ve en la foto. Con la mano derecha, introduzca el levantacintas y enganche la cinta con la punta del levantacintas. Coloque la cinta sobre el eje del motor hasta que la base del levantacintas toque el eje. (0) 4. To insure proper belt placement, gently tum belt lifter counterclockwiseand remove. Make sure belt is . pushed back on the shaft. (C) Para asegurar la colocacion correcta de la cinta, gire el levantacintas en sentido opuesto a las agujas del reloj, sadndolo a continuaci6n. Asegdrese de que la cinta este bien colocado sobre el eje. (C) 5. Pidorial of belt installed properly. (Left side of belt should be closest to you). (D) Dibujo de la correcta instalaci6n de la cinta (la parte izquierda de la cinta debe estar mas pr6xima a usted). (0) Quite la manguera. NOTA: LA CINTA SE SALTARA SI NO ESTA BlEN INSTALADA. NOTE: THE BELT WILL COME OFF IF NOT INSTALLED PROPERLY. 1 COLOQUE LOS I ill11 1. Place wall mounting bracket against wall as shown. Use screws provided to mount bracket. (A) 1. Coloque el soporte contra la pared como en la foto. Utilice 10s tomillos provistos para montarlo. (A) 2. Hang cleaner and attachments as shown. (B) 2. Coloque la aspiradora y 10s accesorios tal y como se ve en la foto. (B) / HANG CLEANER HERE I 81994 Royal Appliance Mfg. Co. All rights resewed. Part No. 1-193954001 Rev. 9/95
