escalera retráctil a pantografo instrucciones de montaje e
Anuncio
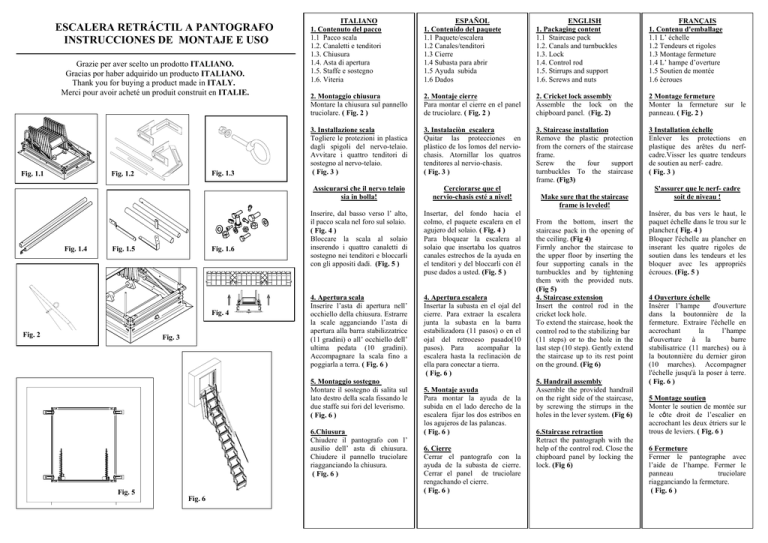
ESCALERA RETRÁCTIL A PANTOGRAFO INSTRUCCIONES DE MONTAJE E USO Grazie per aver scelto un prodotto ITALIANO. Gracias por haber adquirido un producto ITALIANO. Thank you for buying a product made in ITALY. Merci pour avoir acheté un produit construit en ITALIE. Fig. 1.3 Fig. 1.2 Fig. 1.1 Fig. 1.4 Fig. 1.6 Fig. 1.5 Fig. 4 Fig. 2 Fig. 3 ITALIANO 1. Contenuto del pacco 1.1 Pacco scala 1.2. Canaletti e tenditori 1.3. Chiusura 1.4. Asta di apertura 1.5. Staffe e sostegno 1.6. Viteria ESPAÑOL 1. Contenido del paquete 1.1 Paquete/escalera 1.2 Canales/tenditori 1.3 Cierre 1.4 Subasta para abrir 1.5 Ayuda subida 1.6 Dados ENGLISH 1. Packaging content 1.1 Staircase pack 1.2. Canals and turnbuckles 1.3. Lock 1.4. Control rod 1.5. Stirrups and support 1.6. Screws and nuts 2. Montaggio chiusura Montare la chiusura sul pannello truciolare. ( Fig. 2 ) 2. Montaje cierre Para montar el cierre en el panel de truciolare. ( Fig. 2 ) 2. Cricket lock assembly Assemble the lock on chipboard panel. (Fig. 2) 3. Installazione scala Togliere le protezioni in plastica dagli spigoli del nervo-telaio. Avvitare i quattro tenditori di sostegno al nervo-telaio. ( Fig. 3 ) 3. Instalaciòn escalera Quitar las protecciones en plàstico de los lomos del nerviochasis. Atornillar los quatros tenditores al nervio-chasis. ( Fig. 3 ) 3. Staircase installation Remove the plastic protection from the corners of the staircase frame. Screw the four support turnbuckles To the staircase frame. (Fig3) Assicurarsi che il nervo telaio sia in bolla! Cerciorarse que el nervio-chasis esté a nivel! Inserire, dal basso verso l’ alto, il pacco scala nel foro sul solaio. ( Fig. 4 ) Bloccare la scala al solaio inserendo i quattro canaletti di sostegno nei tenditori e bloccarli con gli appositi dadi. (Fig. 5 ) Insertar, del fondo hacia el colmo, el paquete escalera en el agujero del solaio. ( Fig. 4 ) Para bloquear la escalera al solaio que insertaba los quatros canales estrechos de la ayuda en el tenditori y del bloccarli con él puse dados a usted. (Fig. 5 ) 4. Apertura scala Inserire l’asta di apertura nell’ occhiello della chiusura. Estrarre la scale agganciando l’asta di apertura alla barra stabilizzatrice (11 gradini) o all’ occhiello dell’ ultima pedata (10 gradini). Accompagnare la scala fino a poggiarla a terra. ( Fig. 6 ) 4. Apertura escalera Insertar la subasta en el ojal del cierre. Para extraer la escalera junta la subasta en la barra estabilizadora (11 pasos) o en el ojal del retroceso pasado(10 pasos). Para acompañar la escalera hasta la reclinaciòn de ella para conectar a tierra. ( Fig. 6 ) 5. Montaggio sostegno Montare il sostegno di salita sul lato destro della scala fissando le due staffe sui fori del leverismo. ( Fig. 6 ) 6.Chiusura Chiudere il pantografo con l’ ausilio dell’ asta di chiusura. Chiudere il pannello truciolare riagganciando la chiusura. ( Fig. 6 ) Fig. 5 Fig. 6 5. Montaje ayuda Para montar la ayuda de la subida en el lado derecho de la escalera fijar los dos estribos en los agujeros de las palancas. ( Fig. 6 ) 6. Cierre Cerrar el pantografo con la ayuda de la subasta de cierre. Cerrar el panel de truciolare rengachando el cierre. ( Fig. 6 ) FRANÇAIS 1. Contenu d'emballage 1.1 L’ échelle 1.2 Tendeurs et rigoles 1.3 Montage fermeture 1.4 L’ hampe d’overture 1.5 Soutien de montée 1.6 ècroues the Make sure that the staircase frame is leveled! From the bottom, insert the staircase pack in the opening of the ceiling. (Fig 4) Firmly anchor the staircase to the upper floor by inserting the four supporting canals in the turnbuckles and by tightening them with the provided nuts. (Fig 5) 4. Staircase extension Insert the control rod in the cricket lock hole. To extend the staircase, hook the control rod to the stabilizing bar (11 steps) or to the hole in the last step (10 step). Gently extend the staircase up to its rest point on the ground. (Fig 6) 5. Handrail assembly Assemble the provided handrail on the right side of the staircase, by screwing the stirrups in the holes in the lever system. (Fig 6) 6.Staircase retraction Retract the pantograph with the help of the control rod. Close the chipboard panel by locking the lock. (Fig 6) 2 Montage fermeture Monter la fermeture sur le panneau. ( Fig. 2 ) 3 Installation échelle Enlever les protections en plastique des arêtes du nerfcadre.Visser les quatre tendeurs de soutien au nerf- cadre. ( Fig. 3 ) S'assurer que le nerf- cadre soit de niveau ! Insérer, du bas vers le haut, le paquet échelle dans le trou sur le plancher.( Fig. 4 ) Bloquer l'échelle au plancher en inserant les quatre rigoles de soutien dans les tendeurs et les bloquer avec les appropriés écroues. (Fig. 5 ) 4 Ouverture échelle Insérer l’hampe d'ouverture dans la boutonnière de la fermeture. Extraire l'échelle en accrochant la l’hampe d'ouverture à la barre stabilisatrice (11 marches) ou à la boutonnière du dernier giron (10 marches). Accompagner l'échelle jusqu'à la poser à terre. ( Fig. 6 ) 5 Montage soutien Monter le soutien de montée sur le côte droit de l’escalier en accrochant les deux étriers sur le trous de leviers. ( Fig. 6 ) 6 Fermeture Fermer le pantographe avec l’aide de l’hampe. Fermer le panneau truciolare riagganciando la fermeture. ( Fig. 6 )
