PAR Combinacion de Enrutamientos 2
Anuncio
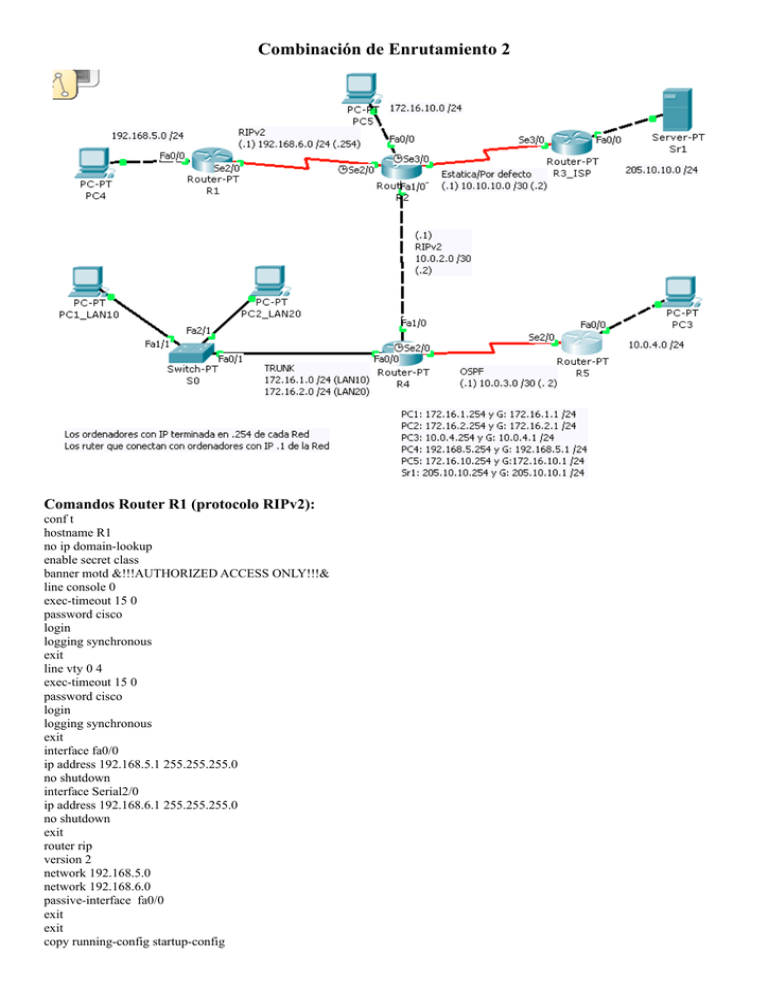
Combinación de Enrutamiento 2 Comandos Router R1 (protocolo RIPv2): conf t hostname R1 no ip domain-lookup enable secret class banner motd &!!!AUTHORIZED ACCESS ONLY!!!& line console 0 exec-timeout 15 0 password cisco login logging synchronous exit line vty 0 4 exec-timeout 15 0 password cisco login logging synchronous exit interface fa0/0 ip address 192.168.5.1 255.255.255.0 no shutdown interface Serial2/0 ip address 192.168.6.1 255.255.255.0 no shutdown exit router rip version 2 network 192.168.5.0 network 192.168.6.0 passive-interface fa0/0 exit exit copy running-config startup-config Comandos Router R2 (Protocolo RIPv2 y Ruta estática): conf t hostname R2 no ip domain-lookup enable secret class banner motd &!!!AUTHORIZED ACCESS ONLY!!!& line console 0 exec-timeout 15 0 password cisco login logging synchronous exit line vty 0 4 exec-timeout 15 0 password cisco login logging synchronous exit interface fa0/0 ip address 172.16.10.1 255.255.255.0 no shutdown interface fa1/0 ip address 10.0.2.1 255.255.255.252 no shutdown interface Serial2/0 ip address 192.168.6.254 255.255.255.0 clock rate 64000 no shutdown interface Serial3/0 ip address 10.10.10.1 255.255.255.252 clock rate 64000 no shutdown exit ip route 0.0.0.0 0.0.0.0 Serial3/0 router rip version 2 network 10.0.2.0 network 192.168.6.0 network 172.16.10.0 passive-interface fa0/0 default-information originate no auto-summary exit exit copy running-config startup-config R2 tiene una ruta por defecto configurada hacia R3, entonces hay que utilizar el comando default-information originate en la configuración para trasferir esta ruta al protocolo rip. Comandos Router R3 (Ruta Estática): conf t hostname R3_ISP no ip domain-lookup enable secret class banner motd &!!!AUTHORIZED ACCESS ONLY!!!& line console 0 exec-timeout 15 0 password cisco login logging synchronous exit line vty 0 4 exec-timeout 15 0 password cisco login logging synchronous exit interface fa0/0 ip address 205.10.10.1 255.255.255.0 no shutdown interface Serial3/0 ip address 10.10.10.2 255.255.255.252 no shutdown exit ip route 10.0.0.0 255.0.0.0 Serial3/0 ip route 172.0.0.0 255.0.0.0 Serial3/0 ip route 192.168.0.0 255.255.0.0 Serial3/0 exit copy running-config startup-config Comandos Router R5 (Protocolo OSPF): conf t hostname R5 no ip domain-lookup enable secret class banner motd &!!!AUTHORIZED ACCESS ONLY!!!& line console 0 exec-timeout 15 0 password cisco login logging synchronous exit line vty 0 4 exec-timeout 15 0 password cisco login logging synchronous exit interface fa0/0 ip address 10.0.4.1 255.255.255.0 no shutdown interface Serial2/0 ip address 10.0.3.2 255.255.255.252 no shutdown exit router ospf 1 network 10.0.3.0 0.0.0.3 area 0 network 10.0.4.0 0.0.0.255 area 0 passive-interface fastethernet0/0 exit exit copy running-config startup-config Comandos Router R4 (Protocolo RIPv2 y OSPF): conf t hostname R4 no ip domain-lookup enable secret class banner motd &!!!AUTHORIZED ACCESS ONLY!!!& line console 0 exec-timeout 15 0 password cisco login logging synchronous exit line vty 0 4 exec-timeout 15 0 password cisco login logging synchronous exit interface fa0/0 no shutdown interface fa0/0.10 encapsulation dot1Q 10 ip address 172.16.1.1 255.255.255.0 interface fa0/0.20 encapsulation dot1Q 20 ip address 172.16.2.1 255.255.255.0 interface fa1/0 ip address 10.0.2.2 255.255.255.252 no shutdown interface Serial2/0 ip address 10.0.3.1 255.255.255.252 clock rate 64000 no shutdown exit router rip version 2 network 172.16.1.0 network 172.16.2.0 network 10.0.2.0 passive-interface fa0/0.10 passive-interface fa0/0.20 redistribute ospf 1 metric 1 match internal external 1 exit router ospf 1 network 10.0.3.0 0.0.0.3 area 0 redistribute rip metric 64 subnets tag 65 default-information originate exit exit copy running-config startup-config Explicaciones de algunos comandos: • Al protocolo RIP hay que transferirle las rutas OSPF, esto se hace con el comando redistribute ospf 1, al que hay que indicarle una métrica y algunos datos mas. • Por el mismo motivo al protocolo OSPF hay que transferirle las rutas RIP con el comando redistribute ospf 1, al que hay que indicarle una métrica (en este caso 65) y algunos datos mas. • Y por ultimo en la Red se transfiere una ruta por defecto en RIP (la generada en R2) que también hay que trasferirsela al protocolo OSPF con el comando default-information originate (si no lo hacemos no hay comunicación entre el Sr1 y PC3). • Como hay un enlace troncal con el Switch por el que van 2 VLAN hay que configurar Subinterfaces en el puerto Fa0/0 Configuración Switch (partiendo de Switch#): conf t hostname S1 enable secret class banner motd &!!!AUTHORIZED ACCESS ONLY!!!& line console 0 password cisco login exit line vty 0 4 password cisco login exit interface fa1/1 switchport access vlan 10 interface fa2/1 switchport access vlan 20 interface fa0/1 switchport mode trunk no shutdown exit exit copy running-config startup-config En el Switch se crean 2 VLAN una para el PC1 y otra para el PC2 y el enlace troncal con el Router R4.


